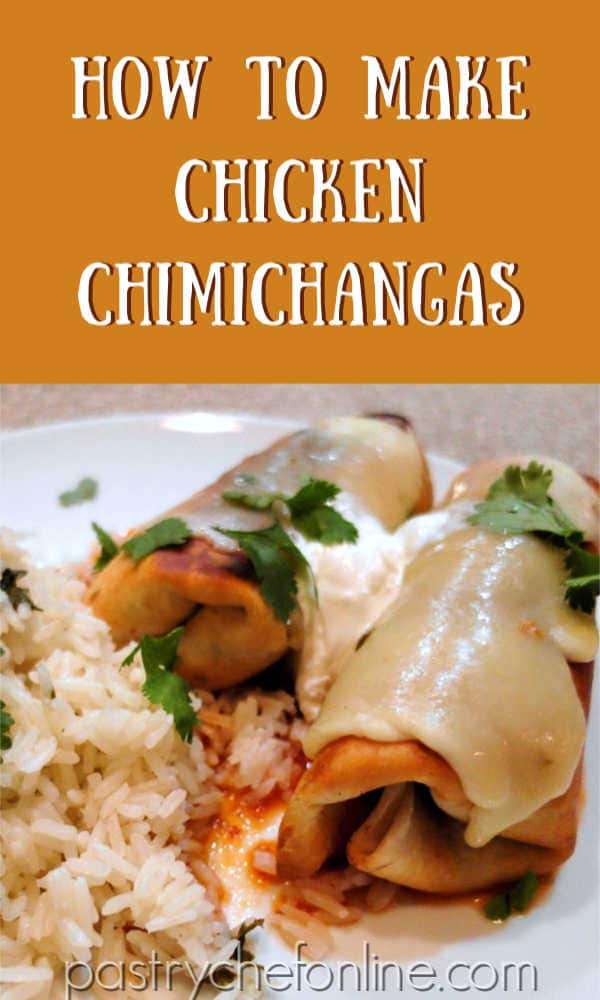
Y’all, I have the most delicious chicken chimichanga recipe for you today. I made them on the spur of the moment, and they weren’t difficult to make, so with a little planning, you can have this TexMex classic on the table in record time.
And if you’re into deliciousness tucked inside a flour tortilla and then fried, you will also probably really love my ode to Taco City in Cocoa Beach, Chings Junior Style.
For ease of browsing, here are all of my poultry recipes in one place. Thanks for stopping by!
Pastry Chef Online Participates in Affiliate Programs. If you make a purchase through one of my links, I may earn a small commission. For more information click to read my disclosure policy
Mexican Food Vs Tex-Mex Food
I didn’t grow up eating Mexican food, or at least what passed for Mexican in Charlotte, North Carolina in the 1970s.
We very occasionally had tacos-from-a-kit, when we were feeling Kicky, but Mexican cuisine—even Americanized, watered-down Mexican and Tex-Mex cuisine—was not on our radar. I didn’t even quiero Taco Bell until well after I finished college.
When I did eventually go to a Mexican restaurant, after perusing the menu for a lot longer than my table mates thought necessary—a very whole lot longer–I finally settled on something called a chimichanga.
I’m pretty sure anyone from Mexico wouldn’t recognize a chimichanga as Mexican food, but here in the US, our definition of what Mexican food is tends to be narrower in some ways and broader in others.
It’s narrower in that Americans, especially white Americans don’t really pay attention to the vast diversity that is Mexican food. I realize that is a generalization, but I do believe it is true.
Mexico is comprised of thirty-one states as well as a federal district, and the cuisine varies widely from east to west and from north to south.
And it’s broader in that Americans are happy to call Mexican-ish dishes that were created in the Southern and Southwestern United States “Mexican food” because we rather clumsily think they’re “close enough.”
What Is a Chimichanga?
The chimichanga falls under the “close enough” category.
It’s basically a deep-fried burrito, and various restaurants in Arizona claim to have invented it.
So, a chimichanga isn’t Mexican. It isn’t even Tex-Mex. It’s Arizona-Mex. And it is mighty fine eating.
Why Use Flour Tortillas for Making Chimichangas?
Deep fry a corn tortilla and you end up with a crunchy shell that shatters when you bit into it.
Deep fry a flour tortilla, and you end up with a crisp shell that yields easily to the bite.
It crunches just a little, but it doesn’t shatter.
If you’ve never had one before, think of a hand pie or empanada. How its thin, crisp outside gives way to a hint of chew in the dough before you find the filling.
So please, use a flour tortilla to make your chimichangas. You will be very glad you did.
If you want to use corn tortillas for something, try these chicken and chorizo enchiladas. Seriously good!
It Started with a Bottle of Herdez
As with so many meals that I prepare, the idea for making chimichangas just sort of happened.
It all started with a jar of Herdez Salsa. I discovered this salsa in the Mexican section at our local grocery store, and The Beloved and I have been in love with it ever since.
When I shared my recommendation on the fan page, it turned out that I was the last to know about this brand. Many people commented that they are huge fans of their whole line of products, so I went In Search Of the other day.
Would you like to save this post?
What I came home with was a bottle of Herdez Taquero Sauce.
My first thought was to cook some chicken in the sauce and make tacos.
That idea morphed into burritos, and from there, it was just a quick dip in hot oil that brought me to chimichangas.
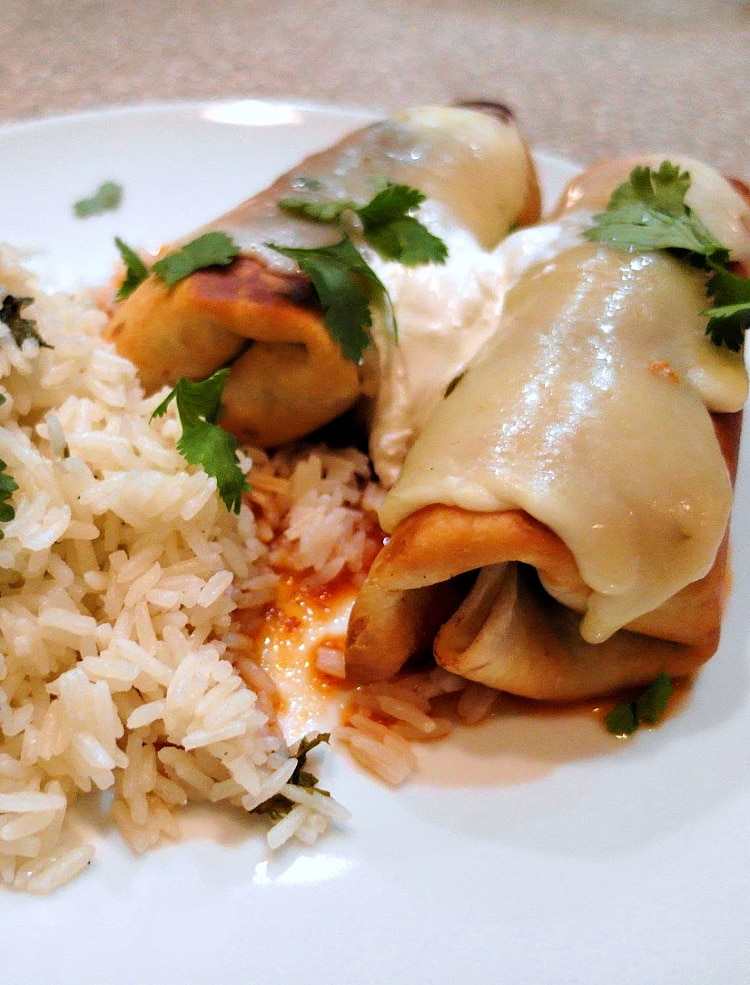
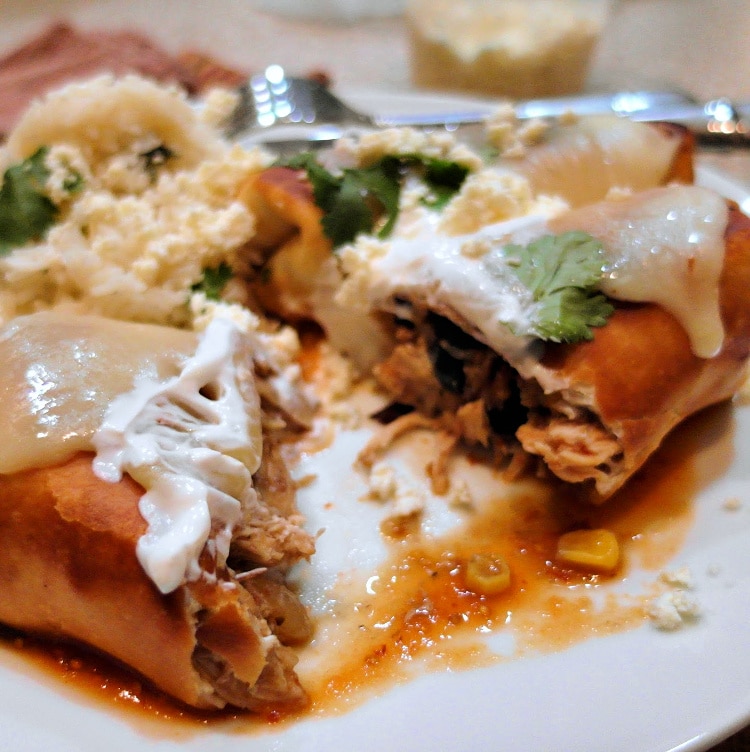
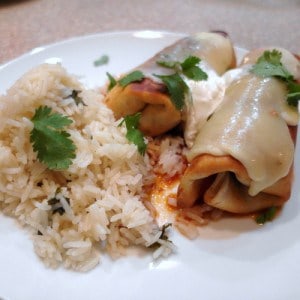
I added some leftover black beans and corn to the mix, served my chicken chimichangas with some cilantro-lime rice and topped with a bit of pepper jack, and they made a great dinner that honestly didn’t take very long to get on the table.
How to Make the Chicken Chimichanga Filling
To make dinner time go much more quickly, be sure to cook and cool your filling either earlier in the day or the day before.
Here’s what you’ll need for the filling:
- Olive oil
- white or yellow onion
- minced garlic
- salt and pepper
- Herdez Taquera Sauce
- chipotle in adobo
- chicken breasts or thighs
- yellow corn, fresh or frozen. Or substitute hominy
- cooked black beans
And here’s how easy it is to put this filling together:
- Heat oil in a pan and then saute the onion for 2-3 minutes.
- Add the garlic, salt and pepper and saute another minute or two.
- Pour in the salsa and minced chipotle in adobo.
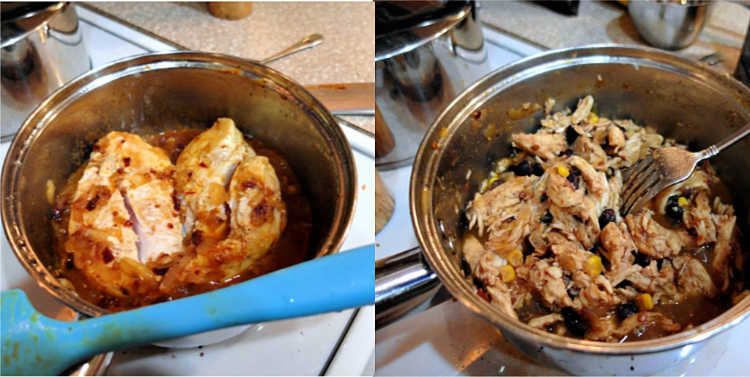
- Tuck the chicken into the sauce, cover the pan, and simmer until the chicken is cooked through, about 10-15 minutes.
- Shred chicken with two forks, stir in the corn and black beans, and simmer uncovered for 5 minutes to reduce the liquid in the pan some.
- Cool and chill before filling your tortillas.
Pro Tip
Make sure your filling is cool before trying to fill your tortillas. Hot filling will turn your tortilla to goo in about 7 seconds, so make sure it has cooled down significantly before slapping it on your tortilla.
Do I Have to Fry These? Can I Bake Them Instead?
Of course you can.
I especially love the crispness of the fried flour tortillas, but you can also brush them with a bit of olive oil, lay them on a parchment-covered sheet pan, and bake them in the oven at 350F for 15 minutes or so, or until heated through. The internal temperature should be 165F.
If you have an Air Fryer, you can also air fry your chimichangas.
How to Fill Your Tortilla for Frying
Fold your filling into your tortilla as if you were making a burrito, pulling the sides up and over the filling and then folding the close end up over the food, tucking it in well and pulling back on it with your fingers to compact the filling.
Since you are going to fry your chimichangas, you want to make extra sure they don’t come undone. You can do what I did and use some water to glue the seam together, or you can use long wooden skewers to “sew” them shut.
If you’ve never had a chicken chimichanga before, or any kind of chimichanga, I’m pretty sure you owe it to yourself to try them out. I think you’ll be very happy that you did.
Questions?
If you have any questions about this post or recipe, I am happy to help.
Simply leave a comment here and I will get back to you soon. I also invite you to ask questions in my Facebook group, Fearless Kitchen Fun.
If your question is more pressing, please feel free to email me. I should be back in touch ASAP, as long as I’m not asleep.
Love This? Please Consider Rating and Reviewing
It helps me and other readers so much if you take a moment to rate and review this recipe.
Your star rating and comments help others decide whether the recipe is worth making, and your feedback helps me continue improving recipes here at Pastry Chef Online.
Other lovely ways to share include pinning or posting on your favorite social media platform.
Thank you so much for taking the time!

Chicken Chimichanga Recipe with Black Beans and Corn
Video
Equipment
Ingredients
For the Filling
- 2 Tablespoons olive oil
- ½ medium sweet onion diced
- 2 cloves garlic minced
- salt and pepper to taste
- ½ cup Herdez Taquera Sauce
- 1 chipotle in adobo minced, plus about 2 teaspoons of the adobo sauce
- 1 large boneless skinless chicken breast (not split) (use thighs if you have them for more flavor)
- ¼ cup yellow corn kernels (fresh or frozen)
- ¼ cup cooked black beans (canned or from dried)
- 8 10 ” flour tortillas
For Frying and Serving (serving suggestions are all optional, of course)
- A little water to “glue” the tortillas shut
- Enough oil or melted shortening (or lard) to fill a cast iron skillet to a depth of 1/2″ (or if you have a deep fryer, use add as much oil as is required)
- ¼ cup Herdez Taquera Sauce per plate (more or less)
- 1 slice pepper jack cheese (or 2 Tablespoons of shredded) per chimichanga
- 1 Tablespoon Sour Cream or Mexican crema per chimichanga
- 1 Tablespoon crumbled Queso Fresca per chimichanga
- 2 Tablespoons guacamole per chimichanga
Instructions
For the Filling
- In a medium saucepan or skillet, heat the oil over medium heat until hot.
- Add the onion and cook until softened and starting to color, about 5 minutes.
- Add the garlic, minced chipotle and sauce, and cook another minute more.
- Season with salt and pepper and add the Herdez Taquera Sauce
- Add the breast (yes, raw and unseared) and cook over medium-low heat, covered, until chicken is cooked through, about 10-15 minutes, depending on thickness of meat.
- Remove the meat and shred with two forks.
- Return to the pan and add the beans and corn. When you think of it, shred the meat some more if it’s not as finely shredded as you’d like.
- Taste and adjust seasonings if necessary, simmer for a few minutes uncovered to reduce the liquid a bit and set aside to cool until warm.
Filling, Frying and Serving
- Use a slotted spoon to gather up your filling and allow most of the liquid to drain back into the pot. If your filling is too wet, your chimichanga might blow out in the fryer.
- Place about 1/3 cup of filling a bit off-center (closer to you) on your tortilla. Arrange the filling so it’s sort of in a rectangle about 4″ long and 2″ wide. No need to measure. I’ll be sad if you do.
- Fold each side of the tortilla over the short sides of your filling rectangle and then pull the side of the tortilla closest to you up and over the filling, trying to tuck it in under the far side of your rectangle of filling.
- Moisten the far side of the tortilla with a little water.
- Make sure the sides are well tucked in and then roll up the tortilla pretty tightly so the filling is completely encased in the tortilla. Press down on the seam and set the filled tortilla seam side down.
- Fill the rest of your tortillas and let them sit there while you heat your oil.
- Pour oil (or melt shortening) in a heavy bottomed skillet (I used cast iron) to a depth of 1/2″.
- Heat the oil over medium heat until it registers between 350F and 360F. Since the oil is shallow, this won’t take long, so keep an eye on it.
- While the oil is heating, place a few layers of paper towel on a cooling rack and place so it’s convenient to the stove.
- Once the oil has come to temperature (I check mine frequently with my Thermapen), carefully place the filled tortillas in the pan, seam-side down. I used tongs to be on the safe side.
- Fry, monitoring the temperature frequently, for about 2 minutes, or until deeply golden brown.
- Turn carefully (again, with tongs) and fry for another 2 minutes, or until deeply golden brown.
- If you’re deep frying, the timing will be about the same. You’re going for medium golden brown.
- You may need to fry in batches. Don’t crowd the pan, and allow about an inch of space between your tortillas.
- As you finish cooking the chimichangas, set them aside on the prepared rack.
- Once they’re all done, transfer them to a sheet pan (sized for your toaster oven or oven, depending on how many you’re making, top with the sliced or shredded cheese and place under the broiler for a couple of minutes–just long enough to melt it.
- To serve, pour a pool of sauce on each plate and set 1, 2, or 3 chimichangas on top of it (totally dependent on how hungry you are).
- Top with any combination of the suggested toppings, or come up with your own.
- Eat while still nice and hot.
Did You Make Any Changes?
Notes
- Olive oil
- white or yellow onion
- minced garlic
- salt and pepper
- Herdez Taquera Sauce
- chipotle in adobo
- chicken breasts or thighs
- yellow corn, fresh or frozen. Or substitute hominy
- cooked black beans
- Heat oil in a pan and then saute the onion for 2-3 minutes.
- Add the garlic, salt and pepper and saute another minute or two.
- Pour in the salsa and minced chipotle in adobo.
- Tuck the chicken into the sauce, cover the pan, and simmer until the chicken is cooked through, about 10-15 minutes.
- Shred chicken with two forks, stir in the corn and black beans, and simmer uncovered for 5 minutes to reduce the liquid in the pan some.
- Cool and chill before filling your tortillas.
Nutrition
Would you like to save this post?
And there you have it. I hope you enjoy this chicken chimichanga recipe and that you switch things up in the filling to make them your own.
Thanks for spending some time with me today. Have a lovely day.

Hi, y’all! I hope you’ve enjoyed this post and hopefully also learned a thing or two.
If you like my style, I invite you to sign up for my occasional newsletter, The Inbox Pastry Chef.
Expect updates on new and tasty recipes as well as a bit of behind-the-scenes action. I hope to see you there!


Join in Today!
Growing up in SoCal (or any part of California for that matter) you can’t escape the lure of Mexican food—I’ve enjoyed it for as long as I can remember. It was good of you to touch on the structure of Mexico as a nation in relation to its multi-faceted cuisine. Wherever the chimichanga originated from, yours looks scrumptious!
Thanks, Brooks! I think it’s important to know the history of food so we can be better connected to it. Honestly though, I’m with you when it comes to chimichangas: wherever they came from, they are The Bomb! =)
Growing up in SoCal (or any part of California for that matter) you can’t escape the lure of Mexican food. I’ve enjoyed this food for as long as I can remember. It was good of you to touch on the structure of Mexico as a nation in relation to their multi-faceted cuisine. Wherever the dish was originated, yours look scrumptious!
My first chimichanga was one of the frozen variety that is available in packs of twelve or so and I developed a crush on them. I had one in a restaurant and I fell in love. You can bet your salsa that I’ll make my own with lots of cheese and stuff!
I hope you have a good week! 🙂
Hey there! I hope you have a great week, too! Starting off with chimichangas was a good start, Dionne! lol
I’m in love with them, and I’m all happy that I can make them myself. Yay!
Looks delicious!!!!
Thanks for stopping in, Stephanie! Yes, they were delicious–I can’t believe it took me so long to make them. It won’t be long before I make them again, I can tell you that! =)