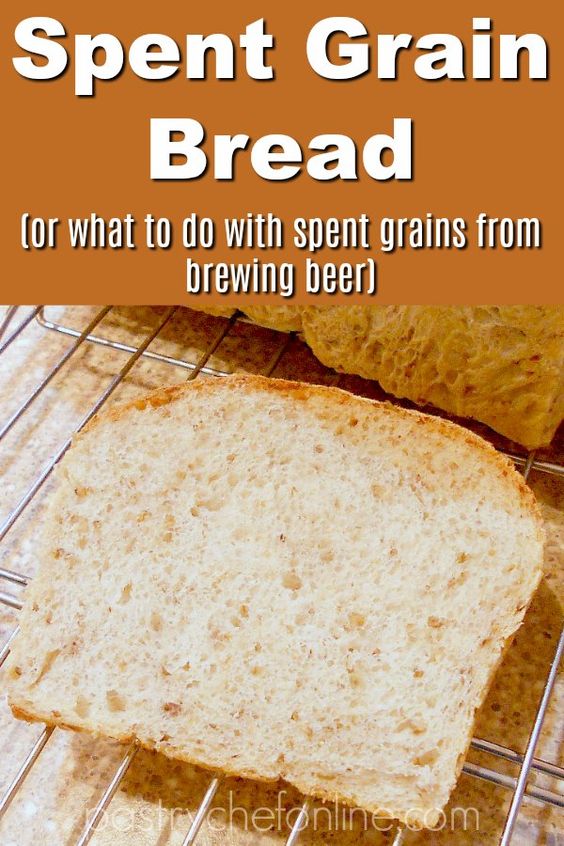
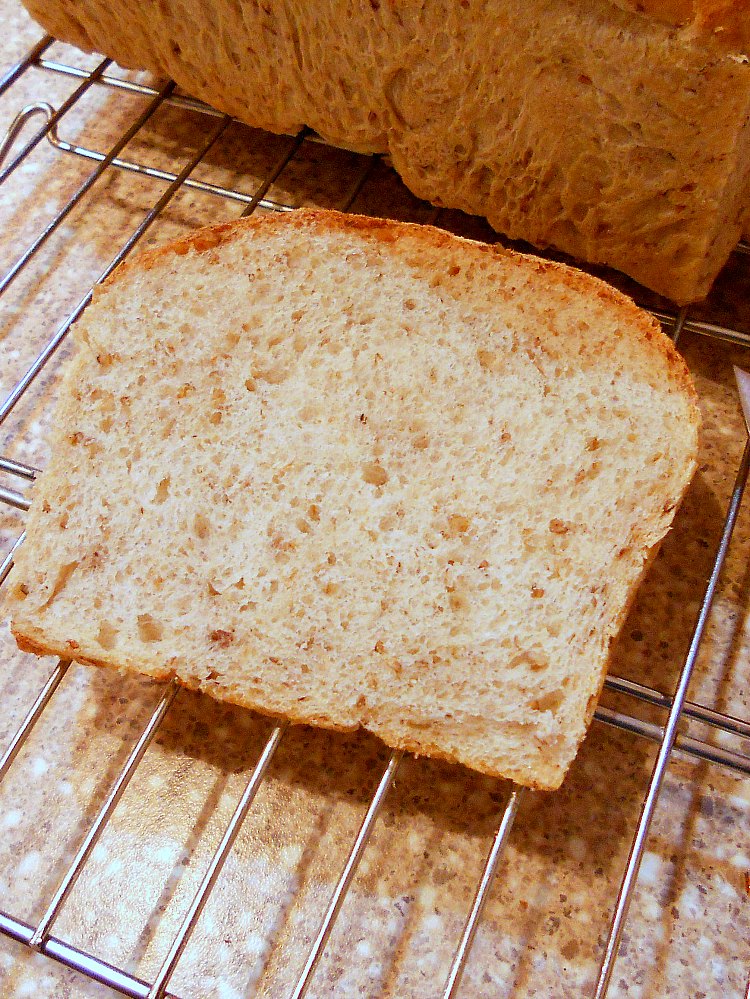
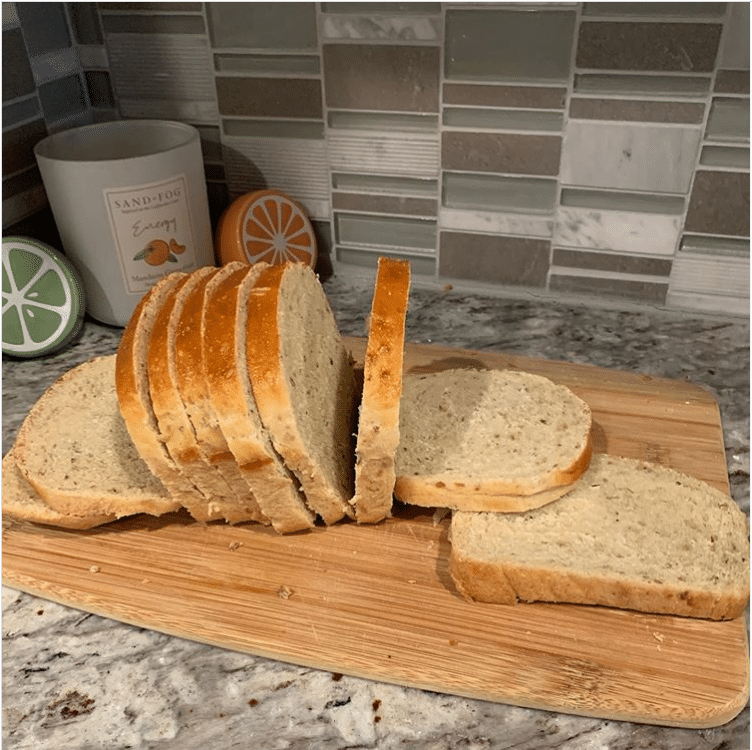
You can make a delicious spent grain bread using the grains left over from home brewing. Let me show you how.
Most bread made with spent grain tends to be hearty and chewy. And there is a time and a place for that. This loaf bakes up nice and soft and is perfect for making sandwiches. I also have a great recipe for spent grain crackers and spent grain granola bars you might really like.
If you’d like to use actual beer in a yeast bread, try my Old Neighborhood Oatmeal Porter Beer Bread.
For ease of browsing, you can find all my bread and rolls recipes in one place. Thank you for visiting!
How To Use Spent Grains in Bread
Bread and beer are closely related and share almost the same ingredients.
And this Particular bread has even more in common with beer than most since I used the spent grains from The Beloved’s latest Brewing Escapade in the dough.
To brew beer, you can either use a malt extract, which is an evaporated form of what you’d get if you boiled cracked whole grains. Or, you can start with the cracked grains and boil them to extract a lot of the flavor.
Pastry Chef Online Participates in Affiliate Programs. If you make a purchase through one of my links, I may earn a small commission. For more information click to read my disclosure policy
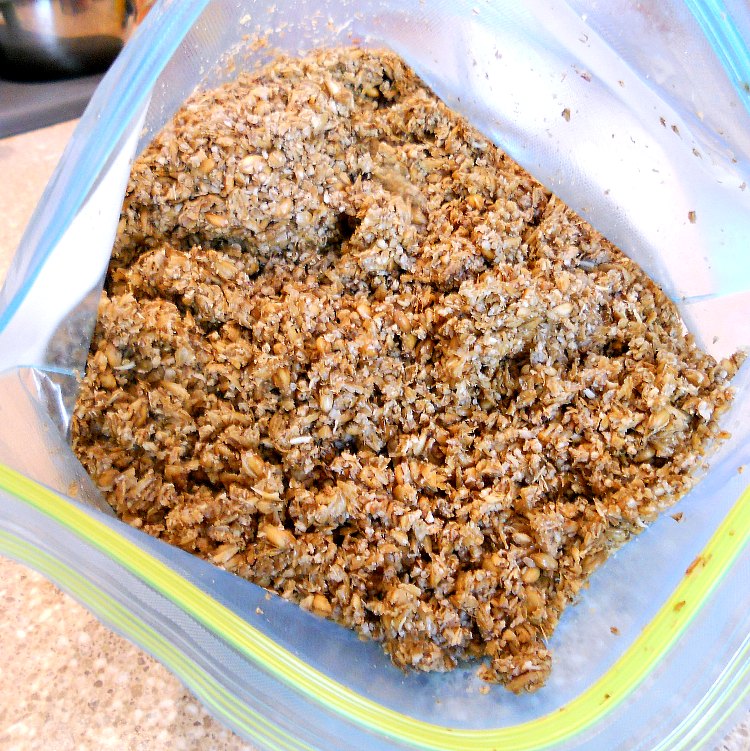
The leftover grains–pounds and pounds, even for fairly small batches of beer–are generally composted or fed to chickens or otherwise tossed away.
This recipe is wonderful! Perfect for sandwiches. My husband and son love it. I made the loaves exactly the way the recipe reads. I’m already starting another batch. Thanks for sharing this amazing recipe.
reader Mimi Richard
Why Bake with Spent Grains?
But just because they’re called “spent grains” doesn’t mean that they are completely bereft of goodness. They still have some flavor left, a bit of the wort (pre-beer) clinging to them, texture, protein, and fiber–all good things, when it comes to bread.
And unless you like super soft white bread, you will appreciate the extras that come with baking with spent grains.
If you like a bread with a strong bready character and flavor, one with a moist, soft-yet-chewy crumb and caramelized crisp-chewy crust, then you are Totally in the right place. You must make this bread.
Should I Dry Out My Spent Grains?
The nice thing about this bread is you don’t have to start with dried grains. You can literally go from brew pot (once cooled down) to dough.
For some applications, like for making granola with spent grains, you’ll want to dry the grains out first.
The easiest way I’ve found to dry our spent grains is to spread them out on a half sheet pan and bake in a low oven (150F or as low as your oven will go), stirring every 30 minutes, until dry and crisp.
This could take upwards of 7-8 hours, so just be aware that, while it’s a hands-off process, it will still require the use of your oven for the better part of a day.
Start Your Spent Grain Bread with a Poolish
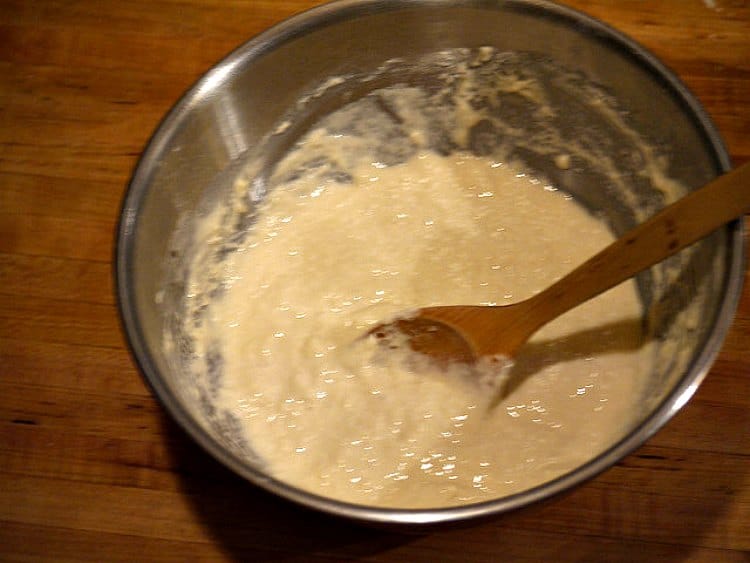
Photo credit, Rebecca Siegel, CC license 2.0
What Is a Poolish?
A poolish is a type of starter for bread. A “proto-dough,” if you will, made up of flour, water and a touch of yeast. Its purpose is to:
- give the yeast a chance to get a jump start on growing without a bunch of other ingredients weighing it down, and
- develop additional flavor
Poolish is also generally considered to be equal parts, by weight, of flour and water along with a smidge of yeast.
So, the hydration of a poolish expressed in bakers percentages is 100%, since the flour and water are of equal weight. What you’re looking for is a bit like a pancake batter texture.
Remember our baker’s percentages from above? A poolish is made of a portion of that 100% of flour, and can comprise up to about 50% of the total weight of the flour.
For example, if your bread will contain 500g of flour (500g=100%), the flour in your poolish can weigh up to 250g, or 50%.
My bread ended up containing 25 oz (709g) of flour, 5 oz (142g) of which was contained in the poolish. So the percentage of flour in the poolish is calculated thusly: 142/709 x 100=about 20%.
NOTE: Since you want your poolish (and the yeast in it) to be nice and active when you start making the “brewers bread,” make the poolish no more than about 12 hours before you make the full bread dough.
Do You Have To Start with a Poolish?
Strictly speaking, no.
I think you really should use some sort of starter, as it is what lends complexity and chew to your finished bread. Breads made with starters or pre-ferments like a poolish are chewier than breads made without. If you’re a fan of chewy bread, definitely use a starter of some sort.
I also turned the poolish into a sponge, which is another interim step that isn’t strictly necessary, but as I didn’t want to use very much yeast at all, making a loose sponge allowed the yeasties that were there to multiply and eat and stretch without having a heavy dough weighing it down. If you want to skip the sponge step, just add more yeast.
About Bakers Percentages
Want a little bread baking science? I shall give it to you.
In order to scale a bread recipe up or down, all ingredients can be expressed as a percentage of the weight of the flour.
However much flour you are using in your bread is considered 100% of the flour. Because 100% is another way of saying “all.”
The rest of your ingredients–liquid, salt, fat, spent grains, yeast–can be expressed as a percentage of the flour.
As a quickie example, if the flour in your bread recipe weighs 500 grams and your water weighs 300 grams, the flour=100% and the water=60%, or 300 divided by 500 times 100.
Understanding baker’s percentages can help you scale your loaf with ease. If you want to scale up our hypothetical recipe to 750g flour (your new 100%), you know you’ll need 60% of that weight in liquid, or 450g (750 x .60).
In regular sandwich bread, the liquid, usually water and/or milk, is scaled at 55-60% the weight of the flour. This percentage of water is pretty much the standard and allows for an even, tight crumb which is good for spreading butter on without it dripping through. In artisan-style loaves, the hydration percentage, or amount of water, is sometimes as much as 75%. That’s what gives you that lovely open crumb and big old holes. Lots of character, but not so great for a pb&j.
I purposely kept the hydration level of this bread to 60% so I’d end up with a nice sandwich loaf. If you’d like a more “artisan-style” loaf of spent grain bread, you can increase the amount of water in your recipe.
I just made this and it’s DELICIOUS! Used my spent grains from a honey wheat ale so they matched perfectly. I was planning to put this in a stuffing recipe but I doubt the bread will survive that long…this recipe is perfect.
reader Nicole
Would you like to save this post?
Where Can I Get Spent Grains?
If you are a home brewer and don’t use extracts but cracked grains, you can just use the grains after you boil them.
If you’re not a home brewer or don’t have a friend who is, if there’s a craft brewery in your area, it’s worth it to ask for some of their spent grains. Chances are they will be happy to let you have some. Or find your local homebrew club and ask those guys.
Since most people just throw them away, they should be happy to let you take some off of their hands.
If you can’t come by spent grains, you could easily substitute soaked grains such as oatmeal, farro, or wheat berries. Or quinoa. You could even throw in some sunflower seeds, if you want.
OK. Enough talk. On to the delicious spent grain bread. Remember, only make your poolish half a day or so (12-ish hours) before starting to bake.
Another Reader Rave
Emily Roth (@madetrueblue on Instagram) made this bread after brewing some beer, and here’s what she had to say.
After last week’s batch of homebrew I used the @onlinepastrychef Spent Grain Sandwich Bread recipe to make a couple of loaves of bread. It’s amazing! Perfect as grilled cheese for sopping up tomato soup!
Emily Roth
She also shared a photo on Instagram. See how beautiful?!
What Else Can I Make with Spent Grains?
Spent grains are pretty versatile. Use them wet or dried. Here are a few recipes for you to try:
If you also would like to know how to use brewers’ yeast to make bread, please read my post about that. For some other bread made using brewers’ yeast, try these recipes
How-To for Making Spent Grain Bread
Here’s the lowdown on the steps of making spent grain bread so you can plan you time accordingly. Note that most of your time will be spent waiting around for Things to Happen.
- Make the poolish.
12 hours before baking, and no more than 16 hours before, stir together your poolish, cover loosely with a lint-free kitchen towel, and let sit out. - Make the sponge.
Mix all the poolish together with the sponge ingredients. You can do this in the bowl of yourstand mixer . Cover loosely and let rise until just about doubled, about 4 hours or so. - Make the dough.
Mix the rest of the dough ingredients in with the sponge. Knead until smooth, shaped into a ball, and allow to rise until almost doubled, 3 hours or so. - Shape and pan the dough.
After the first rise, press out the gases, fold the dough a few times, and then shape into loaves and pan. Cover and allow to rise until almost double, about 1 1/2 hours. - Bake and Cool.
Bake the loaves until they reach an internal temperature of 205F, about 30 minutes. Cool for 10-15 minutes, then remove from pan and cool the loaves completely.
Bread Baking Essentials
I’m not going to tell you you must buy an expensive
But there are two pieces of equipment I really want you to buy, because they are very versatile and you will use them for almost all your baking, and even some of you cooking.
Please get an instant read thermometer, and please buy a kitchen scale.
A thermometer is extremely helpful in knowing when all sorts of things are finished baking or cooking, from your Thanksgiving turkey to your Thanksgiving rolls or pumpkin pie, and just about everything in between.
And a scale ensures consistency of results from batch to batch of whatever you make. Please, please, make these two pieces of equipment part of your kitchen family.
How to Store Your Homemade Bread

You’ve worked really hard and spent a bunch of time making this bread, so you want to make sure to enjoy every slice.
Store the loaves at room temperature for up to a day. Once you start slicing bread, go ahead and slice the entire loaf, place the sliced loaf in a freezer bag, press out the air, and freeze.
Pull out pieces as you need them, microwaving them for 10-12 seconds to thaw or just letting them thaw naturally while you make your sandwich.
Or your toast with butter, jelly, and/or honey.
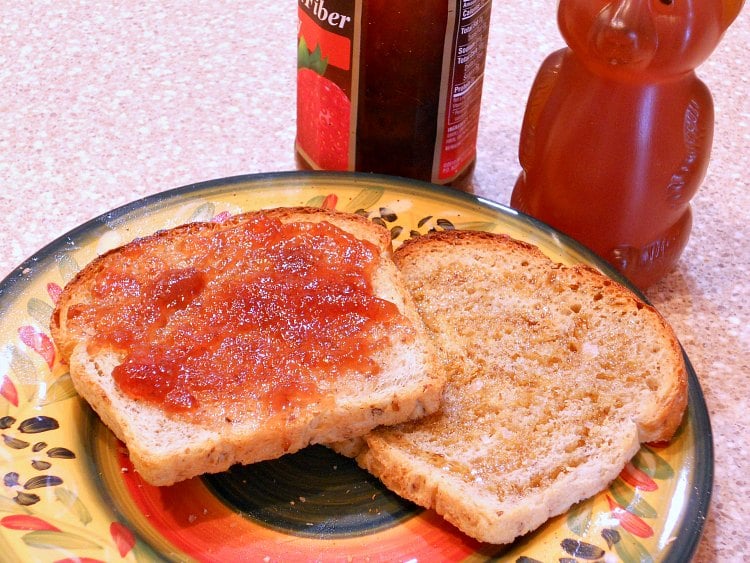
You can also toast your spent grain bread straight from frozen, so you have no excuse for not enjoying every slice of this bread!
It helps me and other readers so much if you take a moment to rate and review this recipe.
Your star rating and comments help others decide whether the recipe is worth making, and your feedback helps me continue improving recipes here at Pastry Chef Online.
Other lovely ways to share include pinning or posting on your favorite social media platform.
Thank you so much for taking the time!

Soft Spent Grain Sandwich Bread
Equipment
Ingredients
For the Poolish
- 5 oz . water
- 5 oz . bread flour
- ¼ teaspoon yeast
For the Sponge
- all the poolish
- 4 oz water
- 4 oz bread flour
- 4 oz spent grains
- ¼ teaspoon yeast
For the Bread
- all the sponge
- 16 oz bread flour
- 2 Tablespoons extra virgin olive oil
- 2 Tablespoons honey
- 2-3 teaspoons kosher salt (to taste, but don’t leave it out)
- 4-6 oz water
For the Egg Wash
- 1 egg , beaten
Instructions
For the Poolish
- Stir all ingredients together.
- Let sit at room temperature, loosely covered, for 12-16 hours
For the Sponge
- Mix all the ingredients together in a big old bowl or in the bowl of your stand mixer.
- Cover loosely, and let stand until very bubbly on top and almost doubled in volume, about 4-5 hours.
For the Bread
- Dump the rest of the ingredients in with your sponge. Start with the lesser amount of water.
- Mix until the dough comes together, adding water if necessary. The resulting dough should be smooth, only slightly sticky and fairly extensible.
- Once the dough is mixed, knead by hand for a good 15 minutes or for about 7 minutes on medium-low speed on the stand mixer.
- Shape dough into a smooth ball and put right back in your bowl. Brush the top with olive oil and cover.
- Let the dough rise in a warmish place until doubled in bulk, about 3-3 1/2 hours.
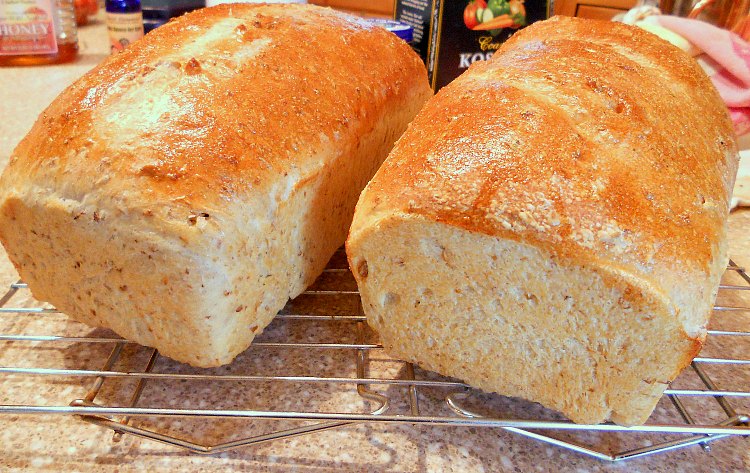
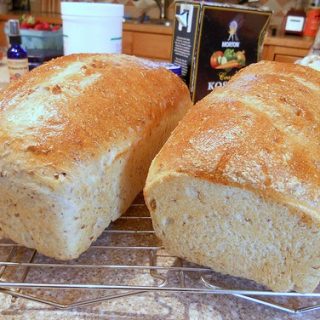
- Evenly press the gases out of the dough, fold it over on itself several times, and divide the dough into two equal parts. Each of my loaves scaled at 21.7 ounces, but yours will vary depending on how much water you ended up adding.
- Shape each half into a rectangle and then roll up, tucking the ends of the cylinder you’ve just made under.
- Place the dough, seam side down, in lightly sprayed bread pans. Mine were 4 1/2″ by 8 1/2″.
- Let the dough rise until almost doubled in bulk, another 1 1/2-2 hours. Preheat the oven to 375F.
- Brush the loaves evenly with the egg wash. You can slash the tops of the loaves with an oiled razor or just leave them alone.
- Bake on the lowest rack for about half an hour, or until the internal temperature of the bread is around 205F and the loaf sounds hollow when you thump it.
- Let the loaves cool on wire racks for at least an hour before slicing and devouring.
Did You Make Any Changes?
Notes
Nutrition
Would you like to save this post?

Hi, y’all! I hope you’ve enjoyed this post and hopefully also learned a thing or two.
If you like my style, I invite you to sign up for my occasional newsletter, The Inbox Pastry Chef.
Expect updates on new and tasty recipes as well as a bit of behind-the-scenes action. I hope to see you there!

Thanks for spending some time with me today. Enjoy the soft spent grain sandwich bread, and have a lovely day.


Join in Today!
Would it benefit the rehydrated spent grains if I briefly pulsed them in a food processor to make sure they aren’t too coarse? I saw that step on another site and thought it made sense…especially since I will be working from dry spent grains?
Hey Lainey, yes. I think if you’re rehydrating spent grains, which are the pointiest things on earth next to sand spurs, it makes sense to pulse them once rehydrated. Or even before you rehydrate. I’ve only made this bread with frozen and thawed spent grains, so it hasn’t been as much of an issue for me. I hope you enjoy it!
About a year ago at a local brewery I made a rustic spent grain loaf with Grainbakers. It turned out ok, but the texture was quite “hearty.” I put a bunch of the spent grain into the freezer and never made it again.
Fast forward to last month when I found your recipe. Girl, that loaf I made does not even compare to yours. I don’t even want to admit how quickly I devoured that bread from your recipe. So delicious toasted with butter and jam or for a sandwich. I’m a convert!
This makes me so happy, Tracy! Thrilled you love the bread!
I also shared it with a coworker who gave the best endorsement ever: “Omg that bread is delicious. It is kind of nutty but also so hearty. I feel like it’s something I’d be served on a good rainy day in a medieval tavern.”
OMG that is awesome! So glad the spent grain love!
Would this recipe work for Spinach Bread?
I am not sure how you mean, Anne? You can certainly add some pureed spinach or spinach powder to the dough and that should work out just fine. If you mean something else, let me know and I’ll clarify. Thanks!
You mentioned you can skip the Sponge step by adding more yeast. Do you add more yeast to the polish or the main bread batch? Also, do you add any other ingredients from the Sponge step to poolish or main bread batch when skipping the Sponge step?
thanks.
Hey, Mike. Yes, if you’d like to skip the sponge step, you’ll just add the ingredients from that step to the ingredients in the poolish. Feel free to increase the total amount of yeast to 1 teaspoon. Note that your bread might not have as fine a texture if you do it this way, but there will be fewer stages to making the bread. If you’d like to make sure the texture is as fine as possible–and the flavor is as good as possible–consider refrigerating the shaped and panned loaves overnight, covered with plastic wrap. Then the next day, pull them out, allow them to sit out for 2-3 hours and then bake. Hope that helps. Enjoy!
How would you use dried spent grain in your recipe? My brewmaster dried them before giving them to me.
I would rehydrate them in an equal amount of water, by weight. And then go on with the recipe using the full amount of liquid called for (within reason. Keep an eye on the dough and make sure it doesn’t get too slack.) It’s an extra step, but I’d be afraid the sharp edges of the dried grains will break your beautiful gluten strands and you won’t end up with a soft-textured sandwich bread. Let me know how it goes.
This is such a fantastic recipe. I have made it twice now and still have enough yeast from the same packet to make it at least once more, maybe twice. The texture is soft now matter how much fiber goes into it.
I used spent grain as well as spent grain flour from OURgrain which I purchased at goingwithourgrain.com
One batch I also used some whole wheat flour, oat bran and wheat germ. The other batch I used only the spent grain as per the recipe.
I am so glad you’re getting some great mileage out of this recipe! It really is beautiful for sandwiches, but I feel like people don’t really believe a spent grain bread could be so soft! Glad you are enjoying it and making it your own. That’s what it’s for! Stay safe, Carol. 🙂
I just made this and it’s DELICIOUS! Used my spent grains from a honey wheat ale so they matched perfectly. I was planning to put this in a stuffing recipe but I doubt the bread will survive that long…this recipe is perfect.
Oh wow, I am thrilled that you like it! Hooray! But man, I bet it’d make a great bread for stuffing, too!
@OURgrain sells dried spent grains and flour. Used by many at home and commercial bakers in breads and other items
That is really good to know! Thanks for the info, Mary Anne! I will look it up and link to it in the post. 🙂
Delicious! So worth all the time! I was a bit confused as the first part mentioning the method said to let poolish sit 12 hours BEFORE BAKING so I did the math to have it all baked within 12-16 hours. Later, I saw you’re supposed to let the poolish sit for 12 hours and then start all the rest? It was fine. Mine laid pretty flat and did not have the lovely rounded top. Do you know what causes that? Maybe I didn’t let it ride for the last time long enough? The bread was awesome even if rectangular! Thank you!
Hey, Jenny! Sorry the directions were a bit confusing. I will reread them and make clarifications. It’s really hard to say why you didn’t get a rounded top, but it could be because the dough was a bit too wet for sandwich bread or that you didn’t let it rise enough. I’m really glad you enjoyed it, and having rectangle bread lets you cut sandwiches into 2 perfect triangles! =)
Just took another run at it today (started yesterday!) and they look lovely! I used the KitchenAid to knead for about 3 minutes and then hand kneaded for 8 more minutes. This allowed me to add in more flour so it was much drier going into final steps. I really enjoy your website and social media posts. I am 51 years old and have cooked all my life but have often been “paralyzed” by some more difficult recipes. Once I worked through eclairs, I was hooked to learn to do more fun stuff. Thank you for helping to coach me on!
Thank you so much for stopping in to touch base! Glad you are enjoying the spent grain bread–so much flavor! I’m thrilled you’re enjoying the site in general too. It’s always a work in progress, going back to spruce up older content and always trying to post new as well. Please let me know if you have any requests and never hesitate to get in touch with questions, Jenny. [email protected] Take care! xo
Well, I can’t figure out how attach an image. Also question, how do you store freshly made bread to preserve it longer. And I only have one loaf pan so I put the other half of the dough in the fridge and trying to decide if I should freeze the dough or bake the loaf and freeze it afterwards. I don’t think we can go through 2 loaves right away. What do you recommend? Thanks
I would bake first, cool completely, slice and then freeze. That way you can pull out slices when you need them instead of having to thaw the whole loaf. 🙂 I’d do the same with the first loaf. Each slice will be good as new for at least 4 weeks!
Jennifer, I made the bread! I used the sour dough starter trying my best to keep the same proportions and my dough was wet, so I had to knead it in a a bit more flour than your recipe. I’ll attach the picture if I can here so you can see the result. It rised well, was very bubbly while resting for 12 hrs. Rised big again after 5 hrs, ( like overflowed the bowl it was in, oops!) I haven’t tasted it yet but it looks pretty.
Oh hooray! If you’d like to share a photo, and I’d love to see, you can email it to me at [email protected], Olga!
Have you ever tried using sour dough starter(“ nature’s yeast “) instead of the poolish? Wonder if it would work?
Thanks!
Olga
I have limited experience with sourdough (ie: I eat it!), but all other things being equal, I think you’d be just fine making this with a sourdough starter, Olga. I don’t know of the proportions you would start with, but if you have a starter, I’m betting you have a good idea of how to proceed! Just give it time–those grains take awhile to soften all the way and the dough is heavy and needs plenty of time to rise so it’s nice and light and sandwich-worthy! Please let me know how it goes!
Thank you! I will let you know when I make it! I’m still waiting for a local brewery to give me some of their grain so maybe a while but I will leave a comment once I bake the bread. Your bread looks so fluffy and “sandwich-worthy”, I’d only want that texture!
I hear you–it’s easier to make a more rustic bread with spent grains. Definitely worth the time to make it soft for sandwiches though! Looking forward to hearing about your results whenever you get some spent grains!
This recipe is wonderful! Perfect for sandwiches. My husband and son love it. I made the loaves exactly the way the recipe reads. I’m already starting another batch. Thanks for sharing this amazing recipe.
Oh, wow, I’m so happy you and your family like it! Thanks for letting me know. 🙂 Enjoy!
We feed our spent grains to our chickens, usually wet. But this time I decided to dry them in the dehydrator. The house stank for 2 days while the grains were drying, but once dried they smelled fine. Does anyone have an idea why they smelled bad (sour) while drying? They went into the dehydrator on high heat immediately after the brew process (still hot when they went into the dehydrator).
The only time I’ve dried mine, I did it in the oven on really low heat. I don’t recall there being a bad smell. Sorry this happened to you. The only thing I can think of is that they had sat wet too long before you started to dehydrate and maybe they got a bit funky…?
I’m definitely going to try this. My husband is an avid homebrewer and I have A LOT of grains at my disposal. Did you use the spent grains whole/cracked as they are or did you dry and ground it into flour first?
I used them cracked after the brew session, so they were still wet but not dripping, Sabrina. Enjoy!
Jenni, would this qualify as “sourdough” bread? I am fascinated by sourdough because it stores longer and it’s supposed to be more digestible (due to lowered phytates). What do you think of those claims? Love hearing your thoughts. Thanks much,
Kate
Sourdough bread is generally considered bread that has been leavened with “wild and captured” yeast strains. This wouldn’t qualify since it contains commercially produced yeast. Usually the flavor of sourdough has a bit of a tang and a more complex flavor. Using starters–even those made with commercial yeast–give the dough more time to develop flavor, but it doesn’t turn them into sourdough, although they can develop some sour characteristics. Does that make sense?
I don’t really know anything about the phytate issue, although seems to me I’ve heard soaking and rinsing grains can help with that. Sorry I can’t be of more help on that score, Kate!
I made this bread yesterday and it sure is fine bread! This was my first time making a yeast bread outside of a bread machine and a boxed bread mix, so I was a little nervous. But it turned out great. I plan to make more of this bread very soon, but I want to use more spent grains to give more texture. How should I adapt the recipe if I were to use 2-3 cups (8-12oz) of spent grains? Less flour, less liquid? I am using wet grains from brewing. Thank you so much for posting this amazing recipe!
Wow, I’m so glad you like it! I will say that the first time I made the bread, I used more spent grains as compared to the flour. I found the bread to be a bit too coarse, but it’s certainly all about your preference, too. I’d start by just subbing out maybe an extra 2 oz spent grains in the sponge while subtracting 1-2 oz of the flour. You may need to tinker w/the amount of liquid you add in the final bread since the grains have liquid in them already, so just add a bit less water and see how the dough comes together.
Then, maybe during the final shaping, you can work in a few more ounces of the grain. I’m not sure that I would use as much as you’re considering since the dough would use much of its elasticity in reducing the flour. To split the difference, consider maybe doubling the recipe and using 2.5 times as much of the grains. Fortunately, extra spent grains will keep well in the freezer for a couple of months! Or, spread them out on a baking sheet and dry them in a low oven, stirring every once in awhile.
We usually dry our spent grains and sprinkle them over cereal, make various baked bars with them etc. This bread recipe sounds great, and I will try it tomorrow. I have just one question: you are meaning 4 oz of wet/moist spent grains, correct? Do you have a suggestion/idea of how much water (or other liquid) I should add to the dried spent grains I have?
Yes, Katja, I use the grains wet. Honestly I wouldn’t know how much extra water to add if you use them dry. Since they get so crunchy, I would suggest that you rehydrate them in hot/warm water for at least an hour or so to soften up a lot of that crunchy stuff then drain and continue. The sharper the edges, the more gluten strands it will cut and the denser your final loaf will be, so I believe it’d be worth your time to try to rehydrate the grains first. Hope this helps! 🙂
I will try that. Great explanation, thank you.
Have been looking for something to do with our spent grains. Will definitely be trying this one soon. Thanks for sharing!
You’re welcome! If you want a ton of more good ideas, here’s a good site to check: http://brooklynbrewshop.com/themash/category/spentgrainchef/ Enjoy!
Looks delicious! We homebrew and I’m just discovering all the things you can do with the spent grains. I have a couple of questions -1) is the spent grain in this recipe dried or still wet? 2) do you have any suggestions for how long can you keep the wet spent grain around? Thanks!!
The bread is really delicious! I made a sweet potato version w/cinnamon and honey that is out of this world, too. The grains I used in this bread were still wet, but I’ve also dried some and used them in cookies. To dry them, I spread them out on Silpat-lined cookie sheets and put them in the oven at about 180F for about 8 hours, stirring occasionally, until bone dry. They should keep indefinitely (within reason, of course!) The dried grains are extremely crunchy w/lots of sharp edges, so I wouldn’t recommend them for bread, but they’re great in the cookies. The cookies are the latest blog post, so you can see them if you want to. I wouldn’t keep the wet grains around any longer than 5 days, refrigerated. Once they start smelling like anything other than sweet cereal, they need to go. We have chickens, so they get them. Plus we can compost them as well:)
Great info! Thanks so much! I’ll definitely look at the cookie recipe 🙂
You’re so welcome! Enjoy, and happy brewing. And baking!
You should start selling spent grain girl! Looks wonderful!
Oh, thank you so much!
Do you need my address to send me a loaf? Looks delicious!
Hee! It really is good. If you have a craft brewery in your area or know a home brewer, you should definitely try it:)
I want this bread! It sounds amazingly good. I love your blog 🙂
Maureen, you are just the best! I so appreciate your stopping in and taking the time to comment. It means a lot! And yes, you should want this bread. It is Fabulous! 🙂
I have made this recipe a few times now, each time the bread is delicious but is not that real fluffy texture. I am currently make a loaf as I type, I noticed you have the ingredients listed in oz not cups (4oz as opposed to 1/2 cup), so this batch I tried weighing everything out instead of measuring, however now my bread seems really dense……help!
Hmmm. If you used both the poolish and sponge, the bread should be nice and light. But, not everyone’s ingredients are always the same, and no 2 loaves of bread are exactly alike. So, if, as you’re making the dough, it seems a bit firm, feel free to add additional water so the resulting dough is nice and supple and stretchy. Do let me know how it goes, and I’m sorry this round was especially dense.