
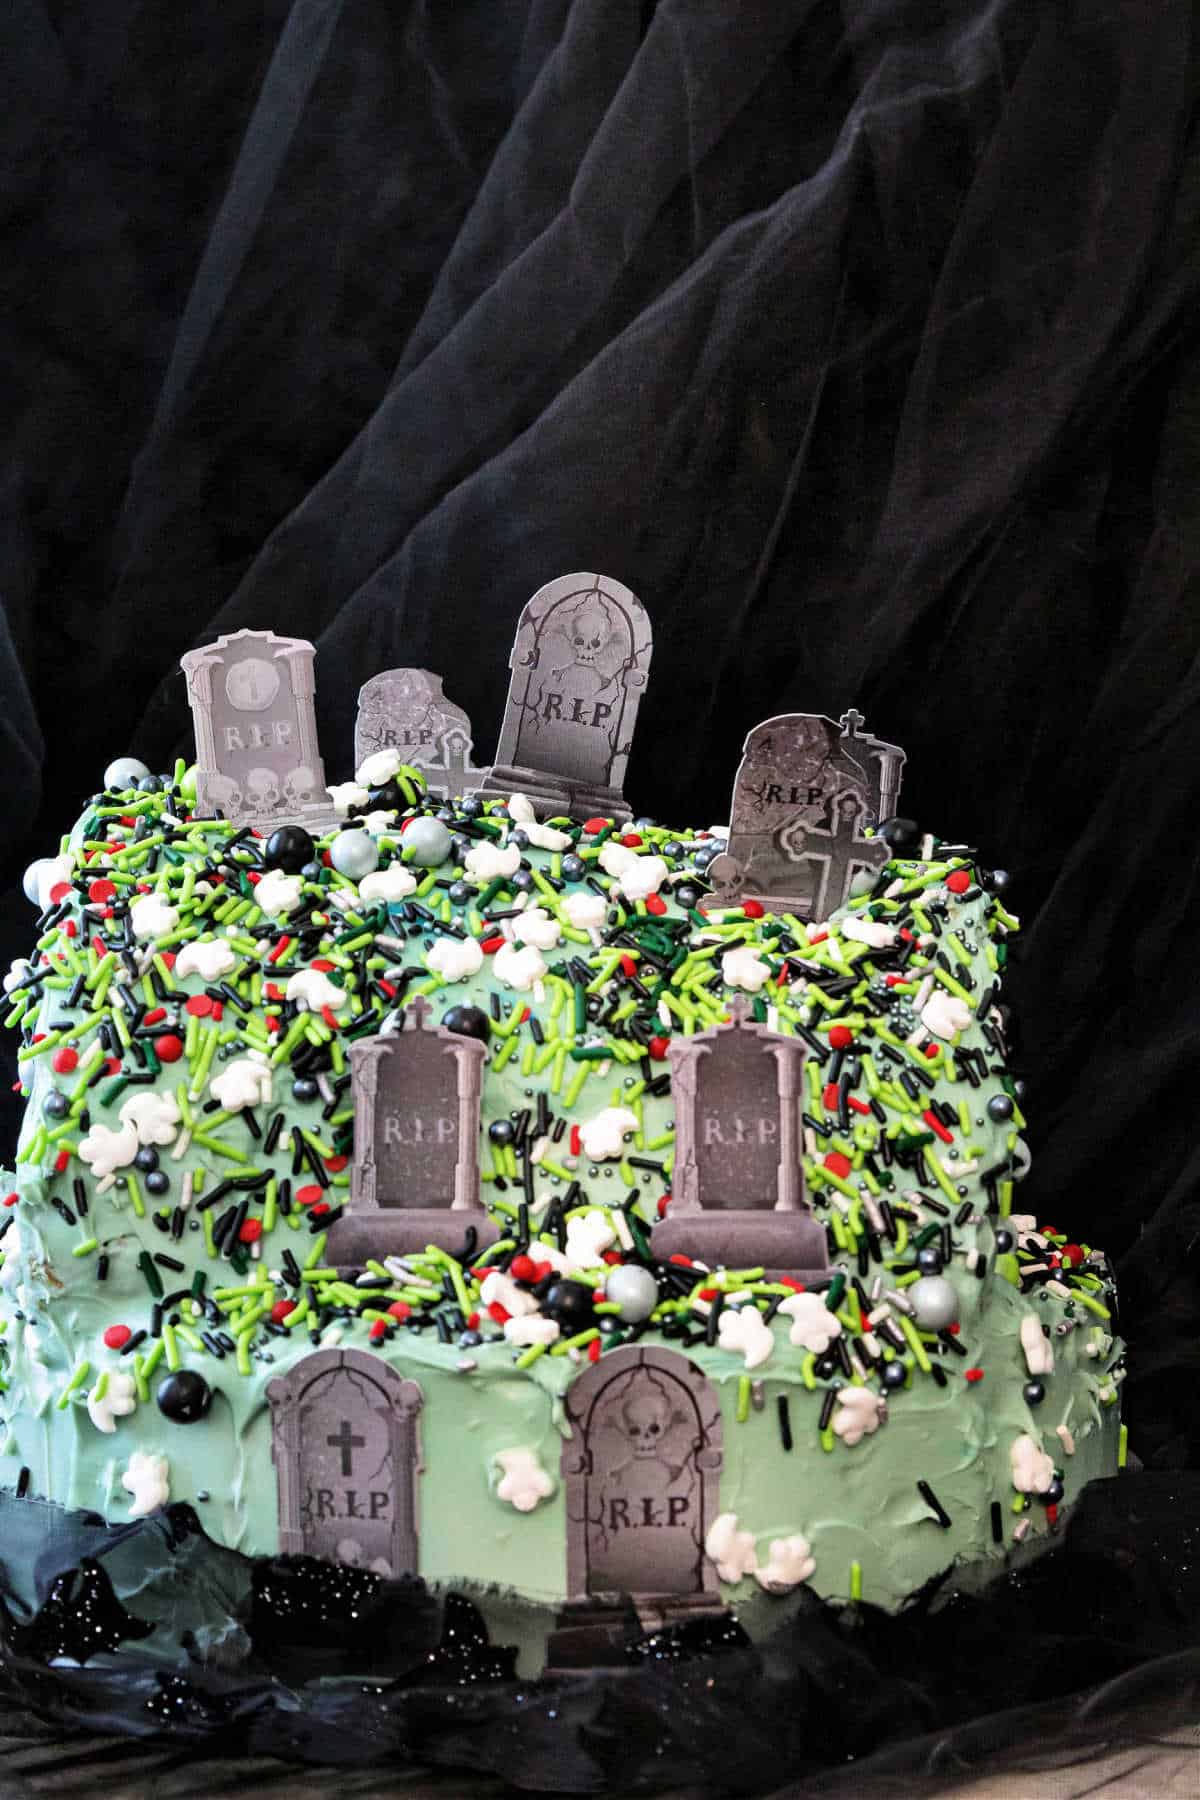
Happy Halloween month, friends! When it’s time to celebrate, why not make this hilltop graveyard cake?
I made mine with a 1-2-3-4 cake recipe, storebought frosting, and fun sprinkles and gravestone cutouts.
I’ll show you how to make a “hill cake,” whether it’s for Halloween or any other holiday. Take a look at my Easter hill bunny cake, which uses the same procedure.
I hope you enjoy the cake, friends. For ease of browsing, you can find all my cake recipes in one place. Thanks for visiting!
Why You Need to Make This Graveyard Cake
The main reason to make this cake is that it is unique looking and it doesn’t require a lot of fancy equipment.
Cutting a round cake in half, stacking the two halves, and turning them on their sides is an easy way to make a hill cake without having to carve anything.
How To Make It
You can use any cake you’d like, whether that’s a boxed mix or a homemade cake.
As long as you have some food coloring and some Halloween decorations, you’re in business.
Here’s what you’ll need:
Ingredients and Substitutions
- A cake pedestal, a large platter, or a 12″ cake pan turned upside down to use as a base for the cake
- 2 8″ round cakes. I used my 1-2-3-4 cake recipe
- homemade or store-bought frosting, about 3-4 cups
- Halloween sprinkles (linking to the ones I bought from Sweets and Treats Boutique)
- small headstone decorations (linking to the ones I bought from Amazon)
Procedure
After you bake and cool your cakes and have your frosting and all your decorations ready, put a thin layer of the frosting all over the pedestal or plate you’ll be using to present your hilltop graveyard cake. Set it aside so it’s ready to go.
Next, here’s what you’ll do:
- Slice any domes off the tops of the cake layers so they are even.
- Add about 1/2 cup icing to the cut side of one layer.’
- Flip the other layer over onto the first.
- Add about 1/4 cup frosting to half of the top layer.
- Cut the cake in half, and flip one half onto the iced top. You will now have 4-layer “half cake.”
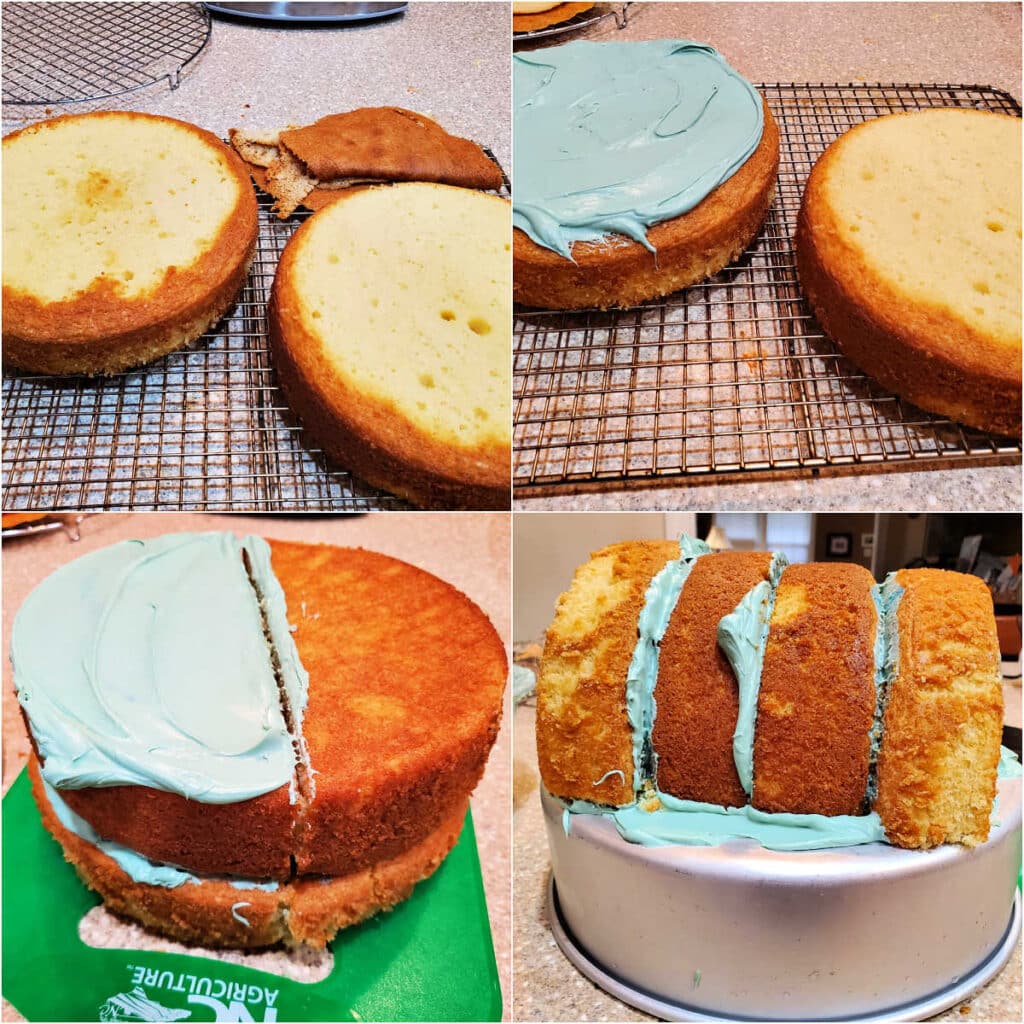
Once you have that, carefully put him, cut-side-down, on top of your prepared pedestal.
Use an offset spatula to spread your frosting all over the “hill and then out to the edges of your cake stand.
If using a cake pan as I did, you can frost the entire pan.
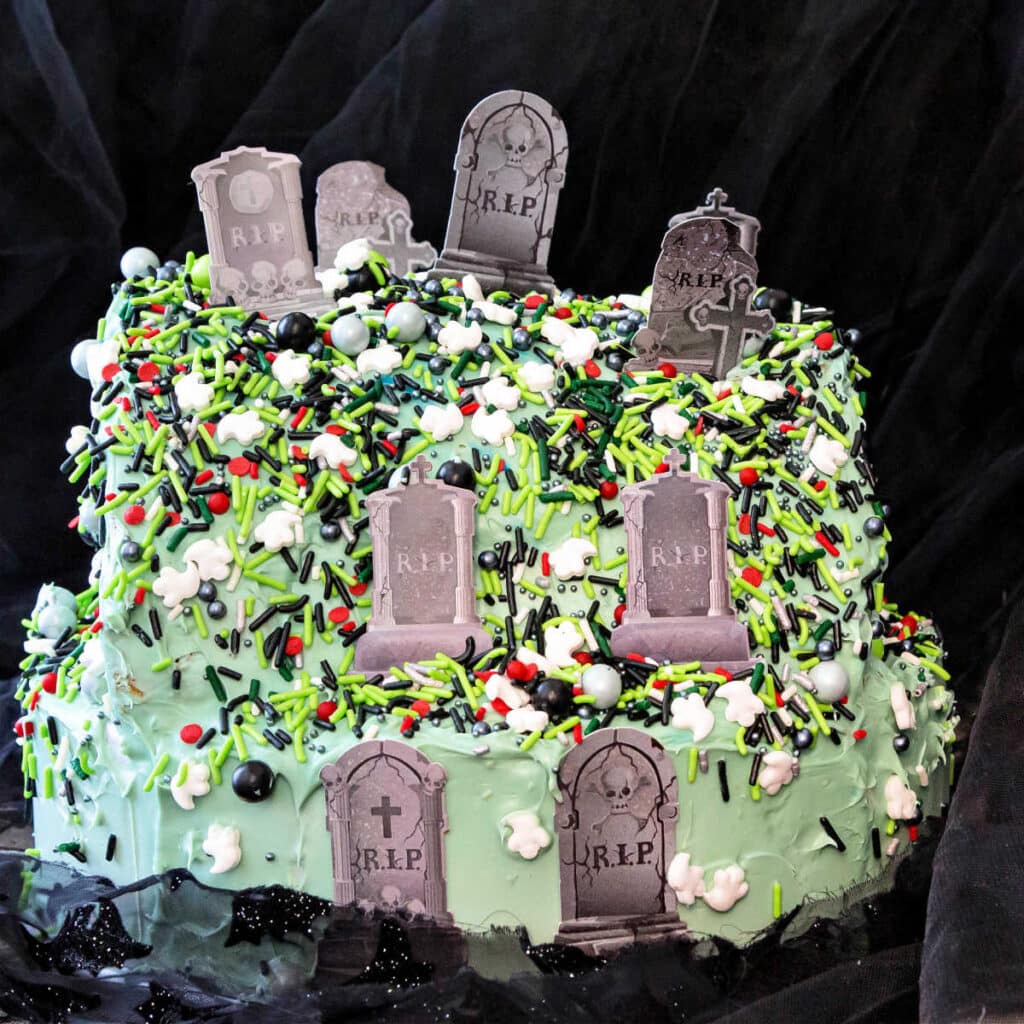
Once you have your base of frosting, stick the headstones into the frosting, either straight up or listing at angles to look like a really old graveyard.
Dim the lights, present your masterpiece, and then dig in.
Equipment You May Need
I made my cake with a hand mixer, so if you don’t have room for a big old
You’ll also want 8″x2″ cake pans. I actually used 1 8″x2″ and 1 8″ x 3″, because they were the first 2 pans I found while digging around in the cabinet!
Cooling racks are also great to have on hand, as is an offset spatula for icing.
And if you’re going to be making a fair number of cakes and need to move them onto a pedestal for serving, the best tool is a cake shovel, also called a cake lifter. Silly name, but super useful.
Tips for Success
If you have made a butter cake such as the 1-2-3-4 cake and you store your frosted cake in the fridge, for best texture, take it out at least an hour before slicing and serving.
I think the best tool for moving your cake to the pedestal before decorating is a large cake “shovel.” I have linked to the one I have in the “Equipment You May Need” section of this post.
Graveyard Cake Q & A
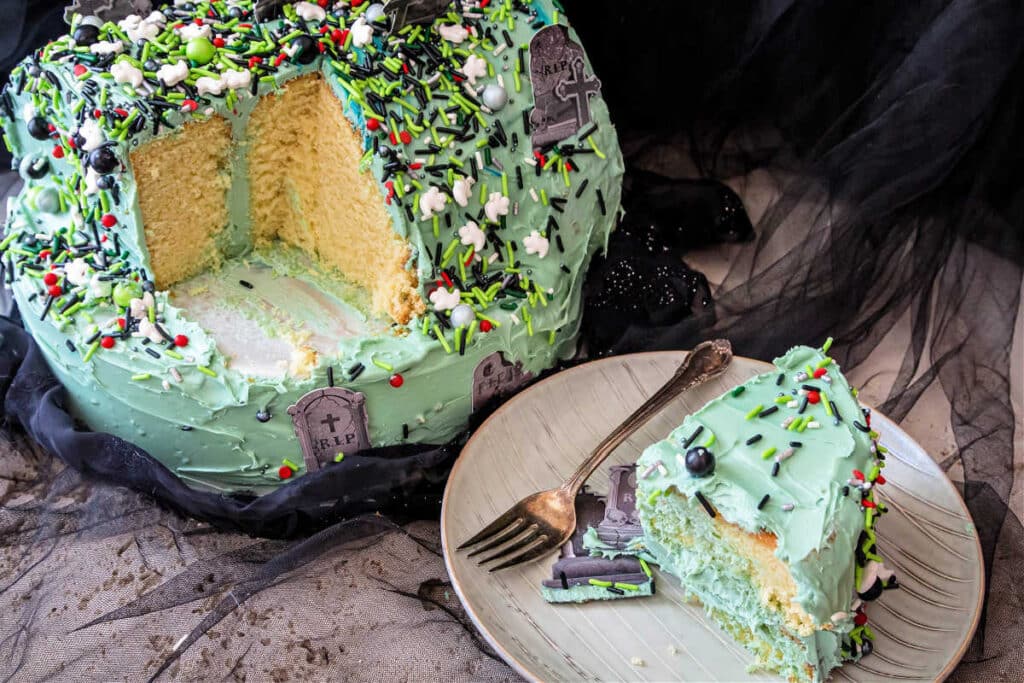
If you cut it the way I describe below, the cake should be able to serve 18-24.
Since it is an irregular shape, the easiest way to cut it is to take the headstones off and then use a sharp knife to cut straight down across the highest point of the cake. Then make two more cuts, halfway between the first cut and the edge of the cake on either side. Make two cuts perpendicular to those three cuts. This gives you twelve sections. Remove sections on either end to serve those as-is or cut them further. Take the tall sections toward the center, place them, cut side down, on a board, and then cut each section into 2-3 pieces.
Before cutting, store loosely covered with plastic wrap in the fridge for 2-3 days. Once cut, keep the leftovers, covered well, at room temperature. To keep it from staling too quickly, try to press cut-sides of the cake together. Once cut, the cake should be good for another 2-3 days.
You can bake and freeze the cake layers up to 3 months before decorating. Just wrap them tightly in plastic wrap and then in foil. Thaw completely before decorating.
Variations
If you don’t want to use sprinkles to decorate your cake, use a grass tip to pipe the frosting to look like a grass-covered hill.
Add the headstones after you’ve done all the piping, but you may want to add additional “grass” around the headstones after you’ve placed them. That way, it will look like your graveyard has been neglected.
Questions
HAPPY HALLOWEEN!!!
Welcome to 2022’s #HalloweenTreatsWeek event!
#HalloweenTreatsWeek is a yearly Halloween blogging event that is hosted by Angie from Big Bear’s Wife . This event is an online, week-long event that is filled with some amazingly wicked Halloween treats and recipes from some fantastic Halloween loving bloggers!
For this years 5th annual #HalloweenTreatsWeek event we have 20 hauntingly talented bloggers that are sharing their favorite Halloween recipes throughout the week! You can following the hashtag #HalloweenTreatsWeek on social media to collect all of these frightful recipes to use at your own Halloween parties and events!
Make Sure to check out all of the fun Halloween recipes that we’re sharing this week!
More Halloween Treats Week Recipes
Check out all of these great #HalloweenTreatsWeek recipes for today
- Mummy Apple Slices from Big Bear’s Wife
- Skull Cherry Pies from Semihomemade Recipes
- Hocus Pocus Spellbook Brownies from Fresh April Flours
- Voodoo Doll Hand Pies from Sweet ReciPEAs
- Rolo Pretzel Eyeballs from An Affair from the Heart
- Gideon’s Frankenstein Cookie Copycat from Best Cookie Recipes
- Halloween Charcuterie Board from Devour Dinner
- Sheet Pan Halloween Confetti Cookie Bars from Savory Moments
- Candy Corn Poke Cake from Hezzi-D’s Books and Cooks
- Harry Potter Witch Hat Tarts from Simply Inspired Meals
- Wicked Witch Icebox Cake from A Kitchen Hoor’s Adventures
- Easy Graveyard Hill Cake from Pastry Chef Online (You’re here!)
- Halloween Nougat from Our Good Life
- Candy Corn Fudge from Take Two Tapas
- Halloween Pretzel Rods from Sweet Beginnings
- Halloween Pretzel Mummies from The Speckled Palate
- Graveyard Brownies from Cheese Curd In Paradise
- Chocolate Covered Strawberry Ghosts from Jen Around the World
- Witch Finger Dipped Pretzels from For the Love of Food
- Candy Corn Sugar Cookie Bars from The Spiffy Cookie
It will help me and other readers so much if you take a moment to rate and leave a review for this recipe.
You can use the stars to rate 1-5 (5 is best), and leave a review in the comments. It helps me make adjustments if any are needed, and comments help others decide whether the recipe is worth making.
Other ways to share include pinning, and/or sharing on your favorite social media platform.
Thank you so much for taking the time!


Halloween Hilltop Graveyard Cake
Ingredients
- 2 8 ” round cake layers
- 3 cups frosting tinted green, blue, or gray
- 1 cup mixed Halloween sprinkles
- small cardstock headstones
Instructions
- Spread frosting on your cake plate, cake pedestal, or an upside-down 12" cake pan.
- Cut the domes off your cake layers with a sharp, serrated knife.
- Use about 1/2 cup frosting to frost the cut side of 1 layer. Flip the second layer over on top of the first so the bottom of that layer is on top.
- Using an offset spatula, spread frosting on 1/2 of the top layer.
- Cut the cake in half, and carefully stack the two halves of the cake, so you have a what looks like half of a 4-layer cake.
- Use a cake shovel to move the cake onto the iced pedestal (or whatever you're using), cut side down.
- Spread frosting in a thin, even layer all over the cake and across the pedestal (and down the sides of the pan if using a cake pan).
- Add small headstones, ghosts, scary trees, etc, wherever you've like them to go.
- Liberally sprinkle on your favorite spooky sprinkle mix.
Did You Make Any Changes?
Notes
Nutrition
Thanks for spending some time with me today.
Enjoy all the Halloween goodies, and have fun making this graveyard cake!
Take care, and have a lovely day.

Hi, y’all! I hope you’ve enjoyed this post and hopefully also learned a thing or two.
If you like my style, I invite you to sign up for my occasional newsletter, The Inbox Pastry Chef.
Expect updates on new and tasty recipes as well as a bit of behind-the-scenes action. I hope to see you there!


Peabody Jennifer Johanson says
This is such a fun cake! Love it!
Jennifer Field says
Thanks! I was trying for the most unappealing frosting color possible! lol