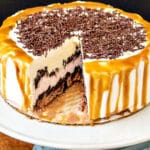
Birthday Ice Cream Cake
This three-layer birthday ice cream cake is festive and fun, and you can modify it to reflect your own personal tastes. I stayed pretty traditional with mine, but that doesn't mean you have to! No matter what flavors of ice cream you use, folks will always be amazed when you slice it!
Servings 12 slices
Ingredients
- 3 cups each of three compatible flavors of ice cream softened
- 24 chocolate wafer cookies coarsely crushed (or other cookie you like)
- 1 ½ cups heavy cream 12 oz
- salted caramel sauce to taste (I used Postre)
- ¾ cup real chocolate sprinkles like these
- ice cream sauce (I used my coffee butterscotch sauce)
Instructions
- Spray an 8" x 3" cake pan or spring form pan with pan spray. Fit in three overlapping pieces of plastic wrap long enough so the ends hang out of either side of the pan by about 6". The pan spray acts as glue to hold the plastic wrap in place.
- Spread the first flavor of ice cream evenly in the bottom of the pan (this will be the flavor on the top, so plan accordingly)
- Spread on half of the crushed cookies and pat down. Freeze for 20 minutes or so.
- Add the second layer of ice cream, spreading it on carefully. I found it easiest to plop on a bunch of dollops of ice cream and then smoosh them all together into one layer with an offset spatula. You don't want to spread it really or you could pull up some of your cookie layer.
- Top with the remaining crushed cookies. Freeze another 20 minutes of so if the cake is a bit melty.
- Finish with the last ice cream flavor. Fold over all the overhanging plastic wrap so the cake is completely covered. Using a cake circle or plate (or other round item just large enough to fit inside your cake pan (bottom of a pot, maybe), press down gently on the whole cake to solidify the layers. Freeze for at least 4 hours.
- Turn the cake out onto a cold serving tray (I refrigerated mine for a good thirty minutes. You could also put it in the freezer if you have room).
- Whip the cream along with enough caramel sauce to make it as sweet as you like (or just use sugar and a pinch of salt if you don't have sauce/don't want to use it). Frost the cake as desired.
- Sprinkle the sprinkles on top and then spoon some slightly warmed butterscotch sauce around the edges so it runs down the sides in Artful Butterscotch Ribbons.
- Keep in the freezer until right before slicing and serving. Use a warm knife for the cleanest cuts, wiping off the blade between each cut.
- Enjoy.
Notes
I bought three different brands of ice cream, and the chocolate one wanted to melt if I looked at it funny. Make sure to have your stand and all your plates cold if you want to admire your cake for more than a couple of minutes. I put all my stuff in the freezer and was glad I did so I could get my photos taken!
You'll notice the cake is on a cardboard round. You can disguise the edges of the board by doing some decorative piping around the bottom of the cake before you add the sauce, but then you have the problem of putting it back in the freezer. Unless your whole cake stand with cake will fit in the freezer, you may just want to forgo the border and live with being able to see the edge of the cake board.
If you are feeling spunky, by all means use all homemade ice cream. I was not feeling spunky and wanted to make something that had a big ROI, if you know what I mean! =)