Puff Pastry
Puff Pastry can be intimidating to make if you don't know the rules, but it is actually not a difficult pastry to make. It just takes a bit time! Follow my rules to demystify the whole process, and you'll soon be making homemade puff pastry with confidence.
Servings 2 1/4 pounds or 18 2oz servings
Calories 308kcal
Ingredients
- 14 oz. all purpose flour (King Arthur preferred for higher protein content.
- 1 teaspoons salt
- 14 oz. unsalted butter divided
- 2 teaspoons lemon juice or vinegar
- 7-8 oz ice water
You will also need:
- a brush with firm bristles for brushing off excess flour
- a separate brush for brushing ice water on the layers optional
- a bench scraper just in case
- a good rolling pin
- a pile of extra flour for dusting
- a bowl of extra ice water
- plastic wrap
- lots of room
Instructions
- In a large bowl, whisk together the flour and the salt. Dice 2 oz. (4 TBSP) butter and toss in with the flour/salt mixture. Refrigerate the rest of the butter.
- With your fingers, rub the butter into the flour until the whole shebang looks like coarse meal. You don't want any larger pebbles of butter. If you feel a pebble, smoosh it. Keep doing this until the whole mixture is uniform.
- Make a well in the center of the flour and add all the lemon juice and the water, a bit at a time, until you have formed a sticky, shaggy, rather ugly dough. You might not use all the water, but you might–just keep your eyes on the sticky, ugly, shaggy prize.
- Gather up your ugly dough, flatten it into a vague rectangle, and wrap it in plastic wrap. Refrigerate for about an hour or so to give the flour a chance to completely hydrate and to let the butter firm back up a bit.
- Take the other 12 oz (3 sticks) of butter out of the fridge. Put it on a large clean work surface and bash it with a rolling pin to soften it. Your goal is to get the butter pliable and into a square shape about 5″ on a side and about 1/2″ thick (or so). Use a bench scraper to help shape your packet o’ butter, if you want.
- And now, let the fun begin. I personally find making puff pastry to be a relaxing pastime. Put on some music, grab a glass of your favorite beverage, and get ready to introduce dough to butter and make 2 become 1.
- Once your dough has been in the fridge for about an hour, take it out and check to see if the consistency of the butter and dough are similar. Just poke each one to see. If the butter is firmer than the dough, refrigerate the dough for a bit longer. If the dough is firmer than the butter, refrigerate the butter for a little while. Always keep everything right around a magical 67-68F. The last thing you want is for your butter to melt all over the place.
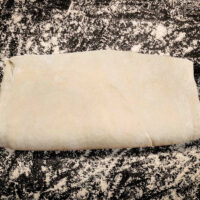
- Liberally flour your work surface and the dough, and roll until you have a square about 10″ on a side. Now, roll each corner of the square out into a thinner flap. What you’ll end up with is a thick-ish diamond of dough about 5-6″ on a side with thinner flaps. (See Video)
- Brush the top of the dough off, and place the packet o’ butter in the center of the thick-ish square of dough. Fold up one flap at a time to completely encase the butter in dough. Don’t forget to brush off all the excess flour. You might need to use a bit of ice water here to get the four flaps to stick together over the butter. For you visual guys out there, what you should end up with is something that looks like a dough envelope with a butter letter inside of it. Make sure the butter is all the way enclosed in the detremps (the dough). If you have futzed about with this for awhile, wrap it in plastic and throw it in the fridge for 30 minutes or so. (See Video)
- Flour your work surface again, and pound the packet of dough with your rolling pin to flatten it somewhat and start to make it a bit bigger. Roll your dough into a rectangle about 16″x 8″. Work with short strokes up and down the packet until things are nice and pliable. This will help keep your dough from ripping. If you do get a tear in your dough, patch it with some flour.
- Don't forget to flip the dough over occasionally while you're rolling.
- Brush off the surface of the dough very well, then brush the surface with just a bit of ice water. (This is a Shirley Corriher trick, and she swears that, not only does this help to keep things cold, but that she gets a better rise because of the additional steam. Try this, or not–it’s here as an additional step, if you want to give it a shot. See video for this action). Fold the dough in thirds, like a business letter, being sure to brush off the excess flour.
- What you have just done is make one turn. Congratulations!
- Keep the edges as square as possible. Rotate the dough 90 degrees, and repeat the rolling and folding a second time. Wrap the whole thing in plastic wrap, and mark a “2” on the wrap with a sharpie. Traditionally, you’re supposed to make finger indentations, but I figure that God made sharpies for this purpose. Besides, if you accidentally dent your pastry, you might get confused. If you’re me, anyway. Throw the now twice turned dough into the fridge for an hour.
- After an hour, take the dough out and give it two more turns (a turn=rolling out and folding up), rotating 90 degrees between each turn. Use the ice water step, or not. If at any time you feel the butter starting to slide around inside the dough, throw it back in the fridge. Conversely, if the butter gets too hard, whack it a few times with the rolling pin to help keep it pliable. After the 2nd (4th) turn, wrap it up, mark it with a “4,” and throw it the fridge for at least 2 hours and up to overnight.
- The next day (or a couple of hours later), take your dough out, whack it with the rolling pin a few times, and give it two more turns. Always rotate the dough 90 degrees between folds and keep the edges as square and even as possible, and always roll to a 16″x 8″ rectangle. Don't forget to flip it a few times while rolling. Roll to a finished thickness of 1/4″, and the dough is finally ready to be used. Hooray!
- Cut the shapes you need, or cut the sheet to the desired dimensions, turn the piece/s over, chill for 30 minutes, and then bake at 425F until puffed and deeply golden brown. Time will vary depending on the size of your pieces, so keep an eye on them.
Notes
Nutrition facts are based on a 2 oz serving. Nutritionals will vary depending on the size of the pieces you cut/what you are using it for.
Active, inactive, and cook times are estimates.
Tips--So Many Tips
- Rule number One for achieving Lovely Lamination is that the consistency of the butter should mimic as closely as possible the consistency of the dough (called detrempe, if you're fancy). If the butter is too hard, it will just break up and poke holes in the detrempe. Rolling out will be Difficult At Best, and you won't end up with a continuous sheet of butter. If the butter is too soft, it will just soak into the dough and guish out the sides, leaving you with an overly-rich dough with exactly one layer. Not good.
- Rule number Two: extra flour is mandatory. Make sure your rolling surface and the surface of the dough is lightly floured at all times. This means that you'll have to keep adding more, a little at a time. Sticking can tear your delicate layers, allowing even right-consistency butter to guish out. Since the tough layers (lean-ish dough) are separate from the tender layers (butter), a little more flour isn't going to hurt anything--you'll still get an excellent rise.
- Rule number Two-A: brush off the excess flour before folding. See, that's why this is rule 2A instead of rule 3. The time that you want the dough to stick is when the dough layers are being rolled together. To make sure that those two layers become one, you need to make sure that the surface is as flour-free as you can make it before folding. They make a keen tool called a bench brush made especially for this purpose, but you can just as easily use a fairly stiff pastry brush or paintbrush.
- Rule number Three: as you roll, flip your dough over fairly frequently. Because of friction, the top layer will always roll farther than the bottom layer. In order to keep the layers even, flip your dough frequently.
- Rule number Four: Chill out. The refrigeration periods between folding and rolling (turns), allow for the butter to maintain Optimum Plasticity--not too cold; not too hot--and for the gluten formed by all the turning (which is really just a type of kneading) to relax enough to be able to roll out multiple times. Don't think you can get away with making more than two turns at a time. Either your butter will start guishing out or the detrempe will become too sproingy, making it very hard to roll out. Thirty minutes to an hour under refrigeration will take care of Both Issues.
- Rule number Five: It's hip to be square. As much as I love the rustic look of Free Form Baked Goods, puff pastry requires fairly strict adherence to the Ideal Rectangle. Roll with finesse, and when finesse fails pull gently with your hands, to square up the dough as much as possible before folding. Keeping the dough square with all the edges meeting up more or less perfectly gives you the maximum amount of dough containing all possible layers. If you don't keep the dough square, there will be some areas around the edges that could lack as many as hundreds of layers, causing uneven rising. This is especially crucial if you want to bake a large sheet of puff, but for consistency's sake, it's always good practice to Shoot for the Rectangle.
More Helpful Puff Pastry Info
- If you egg wash your puff pastry, be very careful that no egg wash drips down the sides. This too can impede the rise.If you don’t believe me, egg wash a whole piece of puff, sides and all. It’ll bake up all dome-shaped and stupid.You really don’t want your efforts to be thwarted when Victory is Within Your Grasp.
- After you cut your pieces of puff, turn them over (cut side up) before baking. This will also help with even rise.
- Chilling the pieces before baking is a Good Idea.I usually let mine hang out in the fridge on parchment-lined baking sheets for half an hour or so or even in the freezer for maybe 30 minutes.
- DO NOT USE a convection oven to bake small pieces of puff. You’ll end up with Slinkies as the air blows the layers over.I know; I’ve been there.The effect may not be as dramatic as in a commercial convection oven, which is like a wind tunnel, but still.A nice hot oven without any breeze will ensure a straight and tall rise.
- Bake your puff pieces with a piece of parchment paper on top. Catch the video below to see why.
- To make a classic Napoleon, or just to make a crisp layer of puff that doesn’t puff very much, place a few baking sheets on top of your sheet of puff.Every fifteen minutes or so, take all the baking sheets out of the oven and push down on the top ones to keep the sheet of puff from rising to Great Heights.
- If you need to cut puff pastry after baking, a serrated knife is an Excellent Tool.
Nutrition
Serving: 2oz | Calories: 308kcal | Carbohydrates: 30g | Protein: 6g | Fat: 19g | Saturated Fat: 11g | Polyunsaturated Fat: 6g | Cholesterol: 48mg | Sodium: 148mg | Fiber: 1g