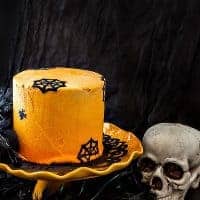
Chocolate Halloween Cake
The flavors of orange and vanilla in this chocolate Halloween cake play so nicely with chocolate that combining all three yields a lovely taste experience. Sophisticated yet subtle, this chocolate Halloween cake is sure to be the hit of your adult Halloween party!
Servings 12 servings
Calories 634kcal
Equipment
Ingredients
For the Cake
- 14 oz granulated sugar 2 cups
- 8 oz all purpose flour 1 3/4 cup
- 1.75 oz sifted cocoa powder
- 0.5 oz black cocoa powder about 2 Tablespoons
- 1 tablespoon espresso powder
- 2 teaspoons baking powder
- 1 teaspoon baking soda
- 1 teaspoon fine sea salt
- 2 large eggs at room temperature
- 4 oz buttermilk, room temperature 1/2 cup
- 4 oz whole milk, room temperature 1/2 cup
- 4 oz melted butter 1 stick
- 2 teaspoons vanilla extract
- 3-5 drops orange oil
- 8 oz 1 cup boiling water
For the Creamsicle Frosting
- 2 oz all purpose flour scant 1/2 cup
- 10.5 oz granulated sugar 1 1/2 cups
- ⅜ teaspoon kosher salt I use Morton's
- 12 oz whole milk 1 1/2 cups
- 12 oz unsalted butter at cool room temperature 3 sticks
- 1 teaspoon vanilla extract Tahitian, if you have it
- 2-3 drops orange oil
- several shakes of chocolate bitters Optional but lovely
Instructions
For the Cake
- Preheat oven to 350F, and set a rack in the center of the oven.
- Prepare 3 6-inch cake pans by spraying with pan spray, lining the bottoms with a parchment circle and spraying again. If you don't have parchment, spray and then dust the pans with sifted cocoa powder to prevent sticking. Set aside on a jelly roll pan. You should be able to fit all three on the pan.
- In a large bowl, thoroughly whisk together the sugar, flour, cocoa powders, espresso powder, baking powder, baking soda, and salt. Set aside.
- In another bowl, thoroughly whisk together the eggs, buttermilk, milk, melted butter, vanilla extract and orange oil.
- Pour the wet mixture into the dry mixture and whisk well for about 3 minutes. While you're whisking, heat up your one cup of water to a boil.
- Pour in the boiling water and whisk thoroughly so the water is completely and evenly incorporated. Make sure to scrape the sides of the bowl while you're mixing. The batter will be fairly thin--much thinner than with the creaming method.
- Divide the batter evenly among the three prepared pans and bake for 20 minutes.
- Carefully turn the pan from front to back and bake an additional 10-15 minutes or until the cakes spring back when touched and an instant read thermometer registers 200F.
- Remove to a rack to cool in the pans for 15 minutes.
- Run a slim knife around the insides of each pan and then turn out onto cooling racks.
- For super moist cake, wrap each layer tightly in plastic wrap and refrigerate until cool. Otherwise, just let them sit out until cool. Refrigerating them once cool will make them easier to stack and frost. Frost and decorate as desired.
For the Ermine Frosting
- In a heavy bottomed sauce pan, combine the flour, sugar, salt and milk. Cook over medium to medium-high heat, stirring constantly, until the mixture comes to a boil.
- Turn the heat down to low or medium low and maintain a very slow boil, stirring frequently, for a minute or two.
- Strain through a fine mesh strainer into a metal bowl. Stir for a few moments and then press plastic wrap onto the surface of the pudding and refrigerate until cool.
- In the bowl of a stand mixer fitted with the whisk attachment, whip the butter on medium and then high speed until light and fluffy, scraping the bowl as necessary.
- Add a large spoonful of the pudding at a time and whip until incorporated before adding the next spoonful. Continue adding the pudding and whipping in between until it is all incorporated.
- Add the flavorings and beat well until it is light and fluffy. Taste and adjust as necessary.
- Color all the frosting a pale orange (or leave some white). Divide into four portions, remembering you'll be using the palest for your crumb coat, so you'll need more of that. Color each other bowl of frosting a deeper shade of orange.
To Frost and Decorate
- Fill and crumb coat your cake with all but about 1/2-3/4 cups of the palest frosting. Place in the freezer, uncovered, for about 15-20 minutes to firm up the crumb coat.
- Frost the top and an inch or so down the sides of the cake with the remaining pale orange frosting. You don't have to be precise here at all.
- Using a small offset spatula, apply the rest of the frostings from palest to most vibrant down the sides of the cake in rough bands of color.
- Using a medium offset spatula, smooth the top of the cake completely, allowing the excess frosting to extend over the edges. Don't worry about the sides yet. Just get the top as smooth as you can get it.
- Hold a straight edge longer than the cake is tall perpendicular parallel to the sides of the cake and rotate your cake stand (or whatever the cake happens to be sitting on) allowing the straight edge to pick up excess frosting and smooth out the sides of your cake. Scrape off the excess and make more passes until the sides of the cake are as smooth and lovely as you want them. You'll have a "wall" of frosting that extends up past the smooth top of the cake. Holding your offset spatula parallel to the top of the cake, sweep the wall inward in sections. wiping the blade of your spatula between each pass and proceeding around the cake until the wall of frosting is gone and your cake is completely finished.
- Decorate with strategically places Halloween Decorations. Store in the fridge and cut the cake cold, but serve at room temperature.
- Enjoy!
Video
Notes
Don't expect your cake slices to stand up nice and pretty. Lay them on their sides. Since the cake is very rich and moist, it wouldn't be the worst thing ever to cut each slice in half allowing each serving to be only 1 1/2 layers tall.
Nutrition
Calories: 634kcal | Carbohydrates: 81g | Protein: 6g | Saturated Fat: 20g | Cholesterol: 113mg | Sodium: 667mg | Fiber: 2g | Sugar: 60g