Savory Apple-Onion Tart
Think of this as "Thanksgiving Stuffing Pie. You could even shove actual stuffing in the tart shell if you wanted. In this case, though, I let the shell itself play the part of the bread in the stuffing.
Servings 6 -8
Ingredients
For the Crust (Makes 2, so freeze one for later or halve the recipe)
- 12 oz all purpose flour
- ¾ teaspoon fine sea salt
- 1 tablespoon sugar (I used demerara)
- 7.5 oz cold , unsalted butter, cut into cubes
- 1.5 oz cold fatback lard
- 3.5 oz cold water
- ½ oz 1 Tablespoon apple cider vinegar
For the Tart Filling
- 3 medium tart apples (I used Granny Smith), organic if you can get them, washed and sliced very thin--about 1/8" or less
- ¼ teaspoon salt
- 2 Tablespoons sugar (I used demerara)
- 2 Tablespoons butter
- 1 medium sweet onion , peeled and sliced thin
- 1 ½ ribs of celery , cut in small dice
- ¾ cup dried , sweetened cranberries
- ½ teaspoon poultry seasoning
- salt and freshly ground black pepper , to taste
- 2 Tablespoons apple cider vinegar
- 2 oz . heavy cream or whipping cream
- 1 slice of bread (from a regular sandwich loaf--whatever you have) cut into very small dice or 1/2 cup bread crumbs
- 2 Tablespoons butter , melted
Instructions
For the Crust
- Whisk together the flour, salt and sugar in a large bowl. Cover and freeze for at least 30 minutes.
- Toss in the cold butter and lard and rub in well. It's perfectly fine to have larger pieces and smaller pieces. You know you're done when the flour seems mealy rather than floury and there are still some big-ish pieces of butter visible.
- Mix the water and vinegar together and then drizzle in roughly half evenly over the top of the flour mixture.
- Toss to combine. Drizzle in about half of what's left and toss again. Don't mix. Toss.
- Test the dough by squeezing a bit of it together in your hand. If it stays together even if you poke at it a couple of times, you're done. If not, drizzle in a bit more water, toss and test again.
- When the mixture still looks pretty sandy but you can squeeze it so it holds together, you're done.
- Turn the dough out onto a lightly floured surface--it will be crumbly, and that's okay. Just shove it all together into a mass, and have your bench scraper handy.
- Dust the top of the shaggy, crumbly dough and roll it out into a long rectangle. It probably won't hold together, but persevere.
- Once it looks sort of rectangle-like, use the bench scraper to help you fold it into thirds. If pieces fall off, just shove them back on.
- Give the dough a quarter-turn on the counter and roll it another roll into a long rectangle. It might look a little better this time, and it might not. Carry on, flouring lightly when things get sticky and using your bench scraper when necessary. Fold into thirds for the second time.
- Continue rolling and folding for another 2 or 3 times, or until the dough behaves itself nicely and doesn't fall apart when you roll. It also will stop crumbling when you fold it, and you might not even have to use the bench scraper again.
- During all this rolling and folding, if the dough gets boingy and wants to snap back a bit, just wrap it up and shove it in the fridge for half an hour or so.
- Once the dough is lovely, cut it in half. You now have 2 rectangles of laminated dough. look at the cut sides and admire your work.
- Form each square of dough into a disc, wrap it in plastic wrap and refrigerate for an hour or so.
- Roll out into a rough-ish circle about 1/8" thick and fit it into a 9" tart ring with a removable bottom, pressing it into the corners firmly. Try to avoid stretching the dough or it will have a tendency to shrink in the oven. You can also make this in a regular pie pan if you don't have a tart ring.
- Trim the edges so the overhang is almost as long as the sides of the tart pan. Then, fold in all the edges and press them firmly against the sides. You now have an edge that is twice as thick as the bottom of the tart. Cool, huh? Thanks, Baking by Hand for that nifty trick. I would never have thought of it. As an added bonus: no crimping--you have a smooth, rolled edge. Nice!
- Freeze for an hour until rock hard.
For the Filling
- Set your oven racks so one is on the bottom and one is in the center of the oven.
- Place a baking stone on the bottom rack and preheat the oven to 450F.
- Set a colander in a bowl.
- Toss the thinly sliced apples with the salt and sugar and put in the colander to drain while you make the rest of the filling.
- Heat a heavy skillet over medium heat.
- Add the butter. When melted, add the onion, celery, cranberries, poultry seasoning along with a healthy pinch of salt and several grindings of black pepper.
- Turn the heat to medium low and cook, stirring occasionally until the onions are soft and just starting to color, about 8-10 minutes.
- Add the vinegar and continue to cook until the mixture is almost dry.
- Add the heavy cream, turn the heat up a bit and let the cream reduce to almost nothing, stirring constantly.
- Taste and adjust the seasonings as necessary.
- Spread out on a plate to cool to room temp. Once it stops steaming, you can put it in the fridge to help speed things up a bit.
- Take the frozen tart shell out of the freezer and evenly spread the diced bread or bread crumbs in the bottom of the shell.
- Spoon on the onion mixture and spread it evenly over the bread crumbs.
- By this time, your apples should have released some liquid into the bowl and be wet and pliable. Don't rinse them. They're ready to go.
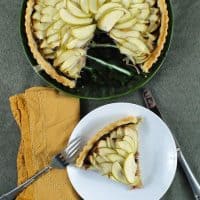
- Place a ring of apple slices about 1/2" in from the inside edge of the tart. These should be placed "shoulder to shoulder" with the peel facing the tart shell. This ring is there just to support the first row of apples and to make sure that there is plenty of apple in every bite. I didn't do this to begin with and had to lift up my apples a few at a time and shove a little apple shims in all around. Liz would have remembered. Sigh.
- Then, place the apple slices, overlapping as in the photo, in concentric circles, starting each circle about 1/2" in from the previous circle. If you want, you can alternate the direction of the slices. I only remembered to do that in the very center.
- When you get to the point where you only have an inch or so of open space to work with, take three or four smaller pieces of apple and arrange them in the open space to give the center of the design some support.
- arrange your center row of apples so the ends are touching in the very center. Take a couple of very thin slices of apple and roll them up into an apple rose. Place the rose in the very center.
- Brush all the apples and the edge of the tart shell with the melted butter.
- Bake on the baking stone for ten minutes. Check to see if your apple rose is getting a bit singed. If it is, cover it with a small piece of foil and bake for ten more minutes.
- Move the tart to the center rack and cover all the apples with a piece of foil, leaving the crust uncovered. Turn the oven down to 375F and bake an additional 10 minutes-15 minutes, or until the apples are very soft and the crust is a lovely golden brown.
- Remove from the oven and let cool. Serve warm or at room temperature.