Peanut Butter Marshmallow Cake (Fluffernutter Cake)
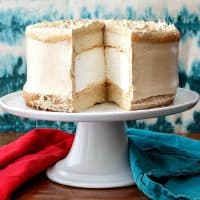
This peanut butter marshmallow cake looks fairly unassuming from the outside, but cut into it to a reveal a 2" layer of marshmallow in the middle! Kids and adults will love this show-stopping cake with its nostalgic, familiar flavor profile. The mallow layer is from Jill O'Connor's Cake, I Love You, and I got her permission to post it here. Thank you, Jill!
Servings 12 servings
Calories 516kcal
Ingredients
For the Mallow Layer*
- cornstarch for dusting
- 1 cup cold water
- 3 Tablespoons unflavored granulated gelatin
- 2 cups granulated sugar
- ¾ cup light corn syrup
- ¼ teaspoon fine sea salt
- 1 ½ teaspoons vanilla extract
- confectioner's sugar, for dusting
For the Peanut Butter Buttercream
- 3 large egg whites
- granulated sugar equal to the weight of the egg whites
- brown sugar equal to the weight of the egg whites
- ½ teaspoon kosher salt**
- ½ teaspoon vanilla extract
- butter, at cool room temperature, equal to the weight of the whites plus the sugar
- 6 oz creamy peanut butter, I used natural peanut butter, but you can also use one that is super smooth
To Assemble and Finish
- 2 9" layers white cake***
Instructions
For the Mallow Layer
- Coat a 9" (I used an 8" pan for mine and it was just fine--worked well with the 9" cake layers which can shrink in the oven some) round cake pan with nonstick cooking spray and dust liberally with cornstarch. Set aside.
- Pour 1/2 cup of the cold water into the bowl of a stand mixer and sprinkle with the gelatin. Allow the gelatin to absorb the water, 15-20 minutes.
- In a large saucepan over medium heat, combine the remaining 1/2 cup water, the granulated sugar, corn syrup, and salt. Heat, swirling the pan occasionally, until the sugar dissolves. Increase the heat to high and let the syrup come to a boil. Cook, without stirring, until it reaches 240F on an instant read candy thermometer. Do not allow the syrup to go past 244F or the marshmallow will be tough and rubbery.
- With the mixer on low, beat the syrup into the gelatin, using the whisk attachment of the mixer. Increase the mixer speed to high and continue beating until the marshmallow is thick, fluffy, and very white but still warm, 10 to 13 minutes. Beat in the vanilla.
- Scrape the marshmallow into the prepared pan, smooth the surface with a spatula, and dust with confectioners' sugar. Let the marshmallow stand, uncovered, for 8-12 hours to firm up. Turn the marshmallow onto a piece of parchment paper lightly dusted with confectioners' sugar. Brush away any excess cornstarch. (Store the marshmallow layer in a covered container or large, self-sealing plastic bag for up to 1 week.)
For the Peanut Butter Buttercream
- Place the egg whites, granulated sugar, brown sugar, and salt in the bowl of your stand mixer.
- Find a pan that the mixer bowl will fit into without touching the bottom. Put about an inch of water in the pan and place over medium-high heat.
- Fit the mixer bowl into the pan and whisk the egg white mixture constantly while the water heats underneath. Once the water reaches a boil, turn the heat down to medium-low and continue whisking the whites until all the sugar has dissolved and the whites are very hot. Shoot for 165F on an instant read thermometer.
- Remove the bowl from the pan and place on your mixer fitted with the whisk attachment.
- Add the vanilla extract, and whisk on medium speed for a minute or two. Increase speed to high and continue whisking until the the meringue is light and billowy and cooled to room temperature.
- Once the meringue is cool, begin adding the cool butter, about 1 Tablespoon at a time. Whisk well before each addition. The buttercream will first break down and get soupy, but it will come back together with the last couple of additions. Scrape the bowl as necessary.
- Whisk in the peanut butter, making sure to scrape the mixer bowl to get it completely incorporated.
- Taste and add a tiny bit more salt if you think it needs it.
To Assemble and Finish
- Slice the dome off of each of your cake layers. Set aside as the baker's treat.
- Make sure you brush off all the extra cornstarch and confectioners' sugar from the marshmallow layer.
- Smear a tablespoon or two of buttercream in the center of your cake platter.
- Center one cake layer, bottom side up, on the platter and press down gently.
- Scoop on about 3/4 cup of the buttercream and spread out to the edges with an offset spatula.
- Place the mallow layer on top of the buttercream and press down gently.
- Add another 3/4 cup of buttercream and spread out. Follow this with the second cake layer, bottom side up.
- Use an offset spatula to frost the sides of the cake. Since the marshmallow is a bit smaller in diameter than the cake layers, the coating will be a bit thicker around the mallow than it will be around the cake layers. I like the naked look, so I kept it at that. Feel free to make extra buttercream to get the look you prefer.
- Spread the rest of the buttercream evenly over the top of the cake so it "hangs over the edge" of the cake a little bit.
- Go around the sides of the cake again with your offset spatula. This will smooth out the sides and leave a little "wall" of buttercream around the edges. Using the flat of your offset spatula, sweep in towards the center of the cake, knocking down the wall so it is even with the top of the cake. Wipe the spatula clean between swipes and continue around the cake until the top is smooth and you have clean edges. Decorate the top as you wish. I just made little peaks by pulling up with my spatula all over the top. You can put mini marshmallows on top if you want, or chopped up peanuts or peanut brittle. Have fun!
- Store in the fridge. Allow cake to come to sit at room temperature for about 45 minutes before eating. To slice, dip your knife in very hot water, wipe it dry, and cut straight down until the marshmallow sort of binds up the knife. Carefully pull the knife out, dip again, wipe dry again, and continue your cut. To serve, place slices on their sides. You can easily cut the marshmallow with the side of your fork. Enjoy!
Notes
*The marshmallow layer needs to be made at least a day ahead, and can be made up to a week ahead. Keep at room temperature, well wrapped in plastic wrap.
**This is more salt than I'd usually put in a buttercream, but the extra salt enhances the peanut butteriness of the peanut butter and is a nice counterpoint to the sweet cake and marshmallow layers.
***I followed Stella Parks's recipe for White Mountain Layer Cake, baking 2 layers in 9"x 2" pans and 1 layer in an 8" pan for snacking purposes. You can find Stella's recipe here, or use your favorite white cake recipe.
****For purposes of getting a good idea of the nutritional value in one slice of cake, I used 3 ounces each for the white and brown sugar, and 12 oz for the amount of butter. Your values may differ since the measurements are dependent on the weight of the egg whites.
Nutrition
Calories: 516kcal | Carbohydrates: 59g | Protein: 6g | Fat: 30g | Saturated Fat: 16g | Cholesterol: 60mg | Sodium: 445mg | Potassium: 112mg | Sugar: 58g | Vitamin A: 710IU | Calcium: 17mg | Iron: 0.3mg