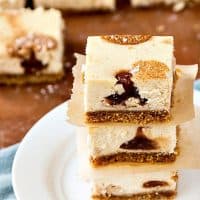
Maple Cinnamon Cheesecake Bars with Apple Butter Polka Dots
These maple cinnamon cheesecake bars contain minimal refined sugar, but aside from that, they are full of delicious fall flavors. The cheesecake mixture is sweetened and flavored with real maple syrup and cinnamon while the apple butter polka dots offer intensey appley surprises.
Servings 24 bars
Calories 312kcal
Equipment
Ingredients
For the Crust
- 22 "sheets" of graham crackers (2 1/2 sleeves)
- pinch of salt
- ½ teaspoon cinnamon
- 3.5 oz cold butter (all but one tablespoon of a 4 oz stick. You can probably get away with just using 3 oz)
- 2-3 tablespoons granulated or brown sugar, optional. It can make the crust very difficult to cut through
For the Cheesecake Mixture
- 4 8 oz packages full-fat cream cheese room temperature
- ¼ teaspoon fine sea salt
- 1 cup real maple syrup room temperature (Grade B, preferred. If you cannot find Grade B, add 1/2 teaspoon maple extract along with the maple syrup)
- 4 large eggs room temperature
- 1 cup buttermilk
- ½ cup all purpose flour
- ½ teaspoon ground cinnamon
For the Apple Butter Polka Dots
- ¾ cup apple butter divided (homemade or store bought)
- ½ cup cheesecake mixture
- 1/4 teaspoon maple extract, optional
For the Stenciled Dots
- 3 tablespoons powdered sugar
- 1 teaspoon cinnamon plus a bit more for making some of the dots darker than others
Special Equipment
- Pastry bag fitted with a 1/4" round tip (you can also use a large zip top bag instead of a pastry bag, but you'll still need a coupler and tip)
- 1 sheet of parchment the same size as the top of your baked bars
- round objects of different sizes for tracing. I used the three smallest cutters from a set of graduated cutters
- Sharpie for tracing
- Baker's dusting wand or similar or a fine mesh strainer or tea ball
Instructions
For the Crust
- Very coarsely break up the graham crackers and place them in the bowl of your food processor or high speed blender. Add the salt and cinnamon and process until you have lovely, fine crumbs.
- Cut the cold butter into cubes and pulse/process until the mixture begins to clump together a bit.
- Press evenly in the bottom of a 9"x13" baking pan (such as the new OXO Non-Stick Pro 9"x13" Cake Pan). I used my bench knife and it worked great to get into the corners. Another great idea from a friend is to take another 9"x13" pan (if you have one) and press that down hard onto the crumbs after sort of evening them out with your hand. Either way works, and both ways are fast. Nice!
- Bake the crust in a 350F oven for 10 minutes. Remove to cool. Turn oven temperature down to 325F.
For the Custard
- In the bowl of your stand mixer fitted with the paddle attachment, cream the cream cheese with the salt on low speed until very smooth, scraping the bowl as necessary. You can also use a hand mixer and a large bowl if you don't have a stand mixer. Just make double sure all your ingredients are at room temperature.
- With the mixer still running on low, slowly stream in a bit of the maple syrup. Allow the mixer to fully incorporate the syrup into the softened cream cheese. Add the total amount of syrup in 4-5 additions, and scrape the bowl well between additions.
- Once the syrup is incorporated, add the eggs, one at a time, mixing in one before adding the next. Scrape the bowl as necessary.
- Stream in the buttermilk (this doesn't have to happen as slowly as the maple syrup) and then mix in the flour and cinnamon. Scrape the bowl and ensure that the mixture is completely smooth and uniform.
- Remove half a cup of the cheesecake mixture and set aside.
- Carefully pour the rest evenly on top of the crust and shake the pan a bit to level it. Cover and chill.
For the Polka Dots (Optional But Delicious)
- Mix about 1/2 of the apple butter into the reserved cheesecake mixture. Add the optional maple extract and mix well. Reserve the remaining apple butter, and if your apple butter is a bit thin, put it in the freezer as well to thicken up.
- Pour into your pastry bag or zip lock, making sure none leaks out of the piping tip, and freeze for an hour to an hour and a half until thickened.
- Once the polka dot mix is nice and thick, get the pan out of the fridge. Bury the pastry tip just below the surface of the custard and squeeze just a tiny amount into the mixture. If you use too much, you'll end up with polka dots with flat bottoms. This happened to me, so if you don't like the way my flat dots look in the photos, only squeeze a very tiny amount for each dot. Do this randomly all over the custard until you run out of apple butter mixture.
- "Reload" your pastry bag with the straight apple butter and make more dots randomly. This way you'll have 2 different colors of dots. You don't have to do this, but it looks kinda cool.
- Place the pan on the center rack and bake for 25 minutes at 325F. Turn off the oven and allow to sit for an additional 30 minutes. The cheesecake should only jiggle slightly in the center. The internal temperature should be about 155F, no higher. If you're there, you're good. If not. Remove the bars carefully from the oven, preheat again to 325 and then put the bars back in (this keeps them from being super heated on the bottoms during the preheat cycle). Bake an additional 3-5 minutes. Err on the side of slightly underbaked, and keep an eye on the temperature using your Thermapen or instant read thermometer.
- Remove the bars to a rack to cool, then cover and refrigerate until cold or overnight
For the Stenciled Polka Dots (Optional But Fun)
- Use different sized round Items and trace around them on the piece of parchment so you have dots randomly all over. Don't go too crazy because you want the paper to be easy to remove, and it won't be if you have dots all on top of each other.
- Cut out the circles--try to stay outside the lines so a minimum of Sharpie remains on your parchment.
- Press the parchment down--Sharpie side up--to the surface of the cheesecake and smooth it out.
- Whisk together the powdered sugar and cinnamon and add some to your OXO Baker's Dusting Wand, fine mesh strainer or mesh tea ball.
- Sift a fairly thick layer of the cinnamon-sugar mixture all over the stencil, reloading your wand when you need to.
- Once you have a nice coverage, dump out any remaining cinnamon-sugar mixture and add a bit of straight cinnamon.
- Dust that on over random polka dots to make them darker.
- Carefully remove the stencil. You may have to get a friend or your kid to help you peel it off from all four corners slowly into the center. Then you can just lift it away with a minimum of extra powdered sugar and cinnamon falling onto your bars and messing up your design. I was able to remove mine alone with minimal horror.
- Slice with a hot knife, wiping the blade clean between cuts and then reheating. You can heat it under very hot water.
Notes
These bars are best cut with a hot knife. Run your blade under very hot water and wipe dry between cuts. As you can tell from some of my photos, I didn't follow my own directions in a few cases. Trust me, these guys will cut perfectly with a hot knife. See the stack of bars for Especially Attractive Specimens.
Using one cup of maple syrup makes a not-too-sweet cheesecake. If you prefer, you may add an additional 2-3 Tablespoons maple syrup to make a slightly sweeter custard.
Nutrition
Serving: 1g | Calories: 312kcal | Carbohydrates: 29g | Protein: 5g | Fat: 20g | Saturated Fat: 11g | Polyunsaturated Fat: 7g | Cholesterol: 81mg | Sodium: 291mg | Fiber: 1g | Sugar: 18g